
[목차]
기본 문법
1. 막대 그래프
2. 선 그래프
3. 산점도 그래프
4. 히스토그램
5. 박스 플롯(상자 수염 차트, 상자 그림)
6. 파이 차트
7. 히트맵
📝Plotly

- interactive한 그래프를 그릴 수 있는 파이썬 그래픽 라이브러리
- 파이썬외에도, R, Julia, F#, MATLAB 등에서도 지원
- 최종적으로 HTML 코드로 구현되며 웹 브라우저 상에 표시되기 때문에,
사용자의 반응에 따른 동적 인터랙티브 데이터 시각화가 가능
기본 문법
import plotly.express as px

fig = px.그래프종류(data_frame=데이터 프레임, x='X축 컬럼', y='Y축 컬럼', color=범례 컬럼,
                   title='제목', labels=dict(X축 컬럼=X축 라벨, Y축 컬럼=Y축 라벨),
                   width=그래프 너비, height=그래프 높이, text_auto=True/False)
fig.show()
📖 그래프 종류:
• 막대그래프 - px.bar
• 선 그래프 - px.line
• 산점도 그래프 - px.scatter
• 히스토그램 - px.histogram
• 박스 플롯 - px.box
• 파이 차트 - px.pie
• 히트맵 - px.imshow
※ plotly는 한글 설정 필요❌
※ plotly에서는 범례가 hue가 아니라 color다.
※ 너비와 높이는 plotly의 경우 픽셀 단위로 그래프를 지정한다. (seaborn 사용했을 때처럼 한자리수로 지정 시 에러뜸)
1. 막대그래프
※ plotly는 seaborn과 다르게 countplot을 제공하지 않는다.
(sns.countplot X 축의 범주별로 행의 개수를 세서 시각화해줌)
※ 따라서 plotly는 groupby를 사용해 별도로 범주별로 행의 개수를 세야 한다.
※ 그 그룹으로 만든 데이터를 이제 그래프 시각화에 사용하는 것이다.
# groupby 예시
region_top10 = data.groupby('시군명').size().reset_index(name = '유기동물 수').sort_values(by = '유기동물 수', ascending = False).head(10)
기본 막대그래프
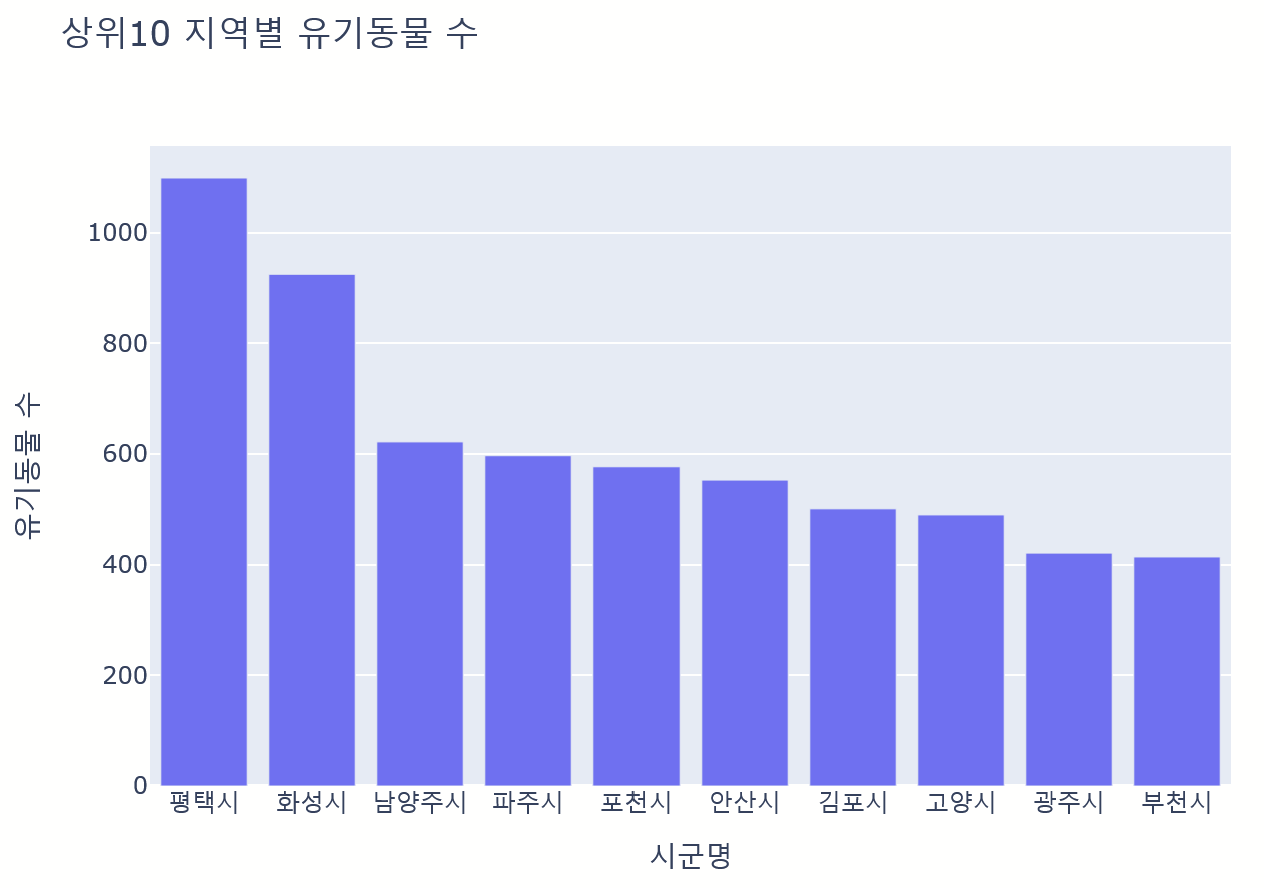
fig = px.bar(data_frame=region_top10, x='시군명', y='유기동물 수',
             title = '유기동물 발견 지역 상위10', width=700, height=500)

fig.show()
막대그래프 - 스타일 커스터마이징

fig = px.bar(data_frame=region_top10, x='시군명', y='유기동물 수', width=700, height=500)

# 막대 색상 설정
fig.update_traces(marker=dict(color='#B1510F'))

# 레이아웃 설정
fig.update_layout(
    title={
        'text': '상위 10 지역별 유기동물 수',
        'y': 0.85,  # 제목의 y축 위치 (0.0 ~ 1.0)
        'x': 0.5,  # 제목의 x축 위치 (0.0 ~ 1.0),
        'font': dict(size=18, family='Arial', color='black'),
         # 제목 글자 크기 및 폰트, 색상 설정
        'xanchor': 'center',
        'yanchor': 'top'
    },
    xaxis=dict(
        title='지역',  # x축 레이블 설정
        title_font=dict(size=15)  # x축 레이블 글자 크기 설정
    ),
    yaxis=dict(
        title='총 유기동물 수',  # y축 레이블 설정
        title_font=dict(size=15)  # y축 레이블 글자 크기 설정
    ),
    paper_bgcolor='#EBE6E1',  # 그래프 외부의 배경색 설정
    plot_bgcolor='rgba(240, 240, 240, 0.5)'  # 그래프 내부 배경색 설정
)

fig.show()
# x축과 y축 레이블 명 좀 더 간편하게 바꾸기
fig = px.bar(data_frame=region_top10, x='시군명', y='유기동물 수',
             title = '유기동물 발견 지역 상위10', width=700, height=500,
             labels={'시군명': '지역', '유기동물 수': '총 유기동물 수'})
데이터 값 그래프에 표기
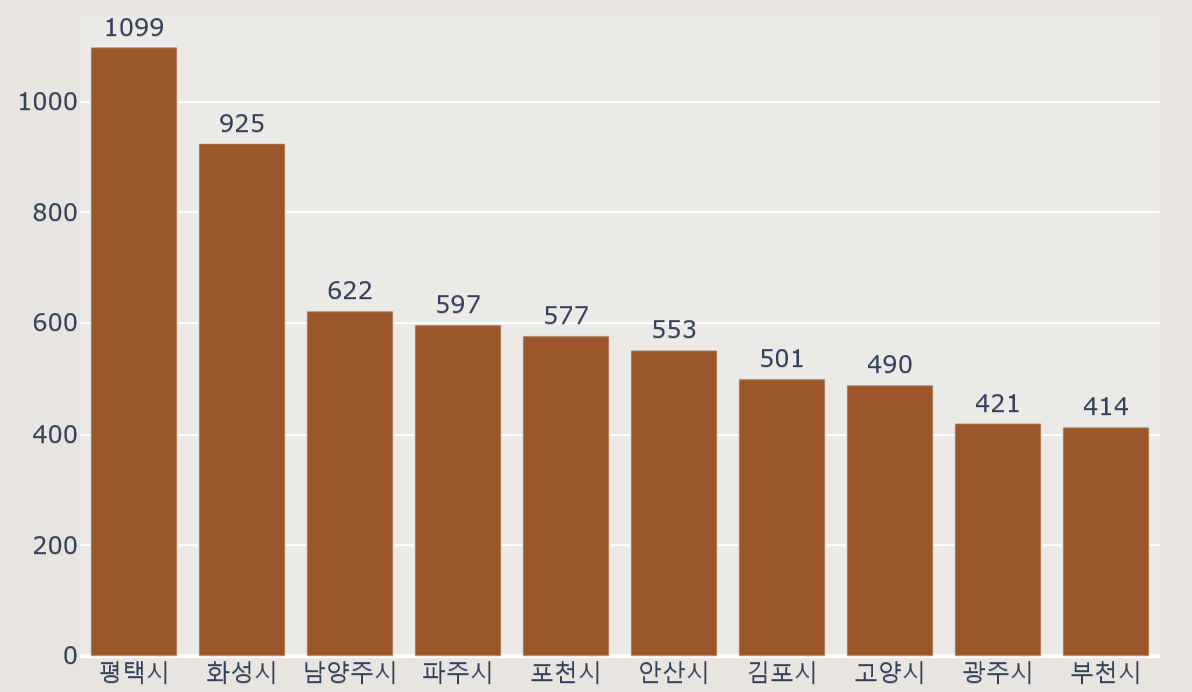
fig.update_traces(texttemplate='%{y}', textposition='outside') # 데이터 값 위치 설정
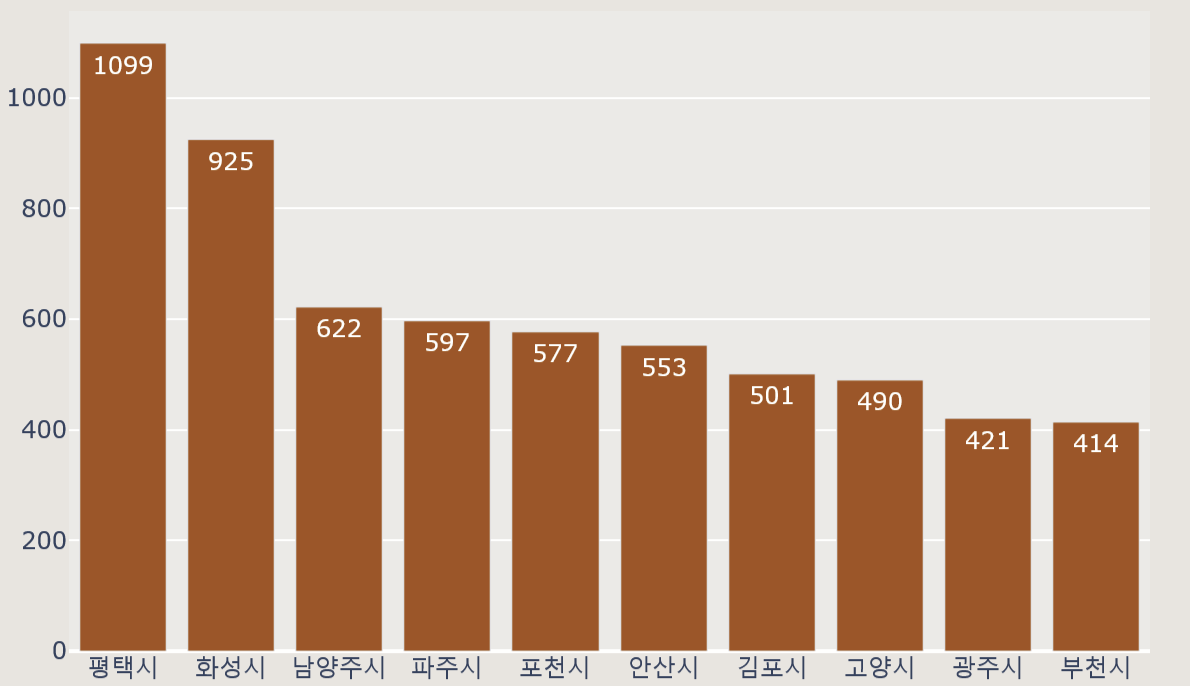
fig.update_traces(texttemplate='%{y}', textposition='inside')
그래프의 그리드 설정
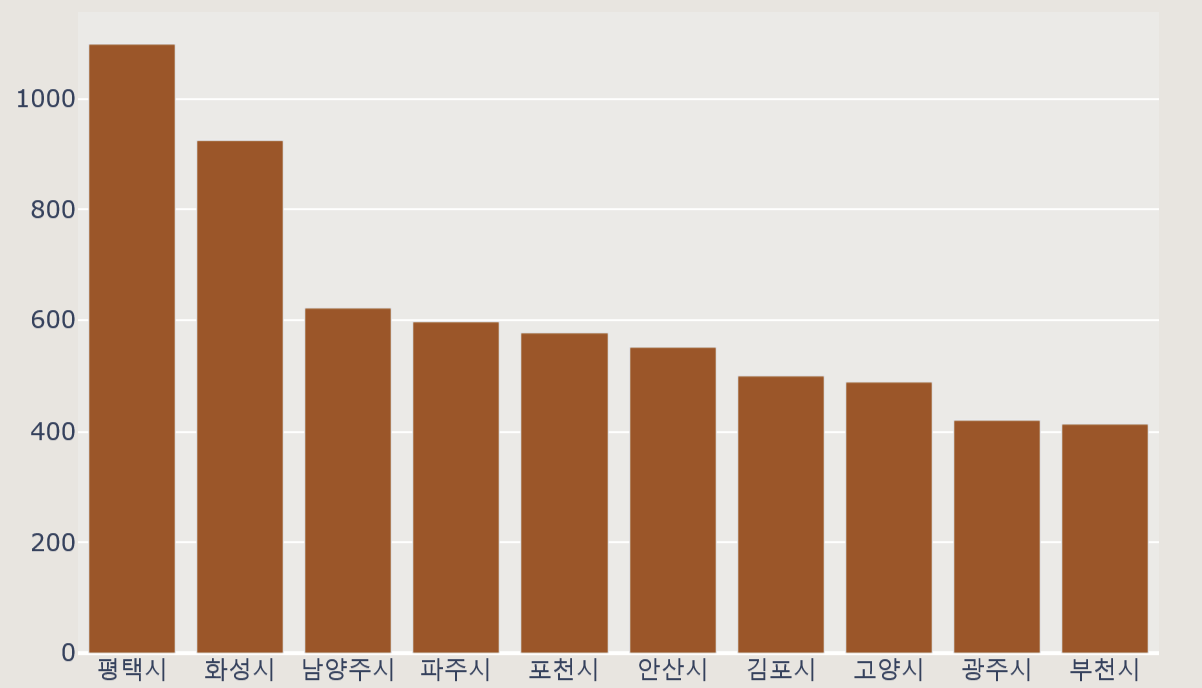
y축의 그리드 선이 기본적으로 활성화되어있다.

fig.update_yaxes(showgrid=False) # y축 그리드 비활성화

fig.update_xaxes(showgrid=True, gridwidth=2, gridcolor='#E1E0DE') # 그리드 굵기 및 색 설정
fig.update_yaxes(showgrid=True, gridwidth=2, gridcolor='#E1E0DE')
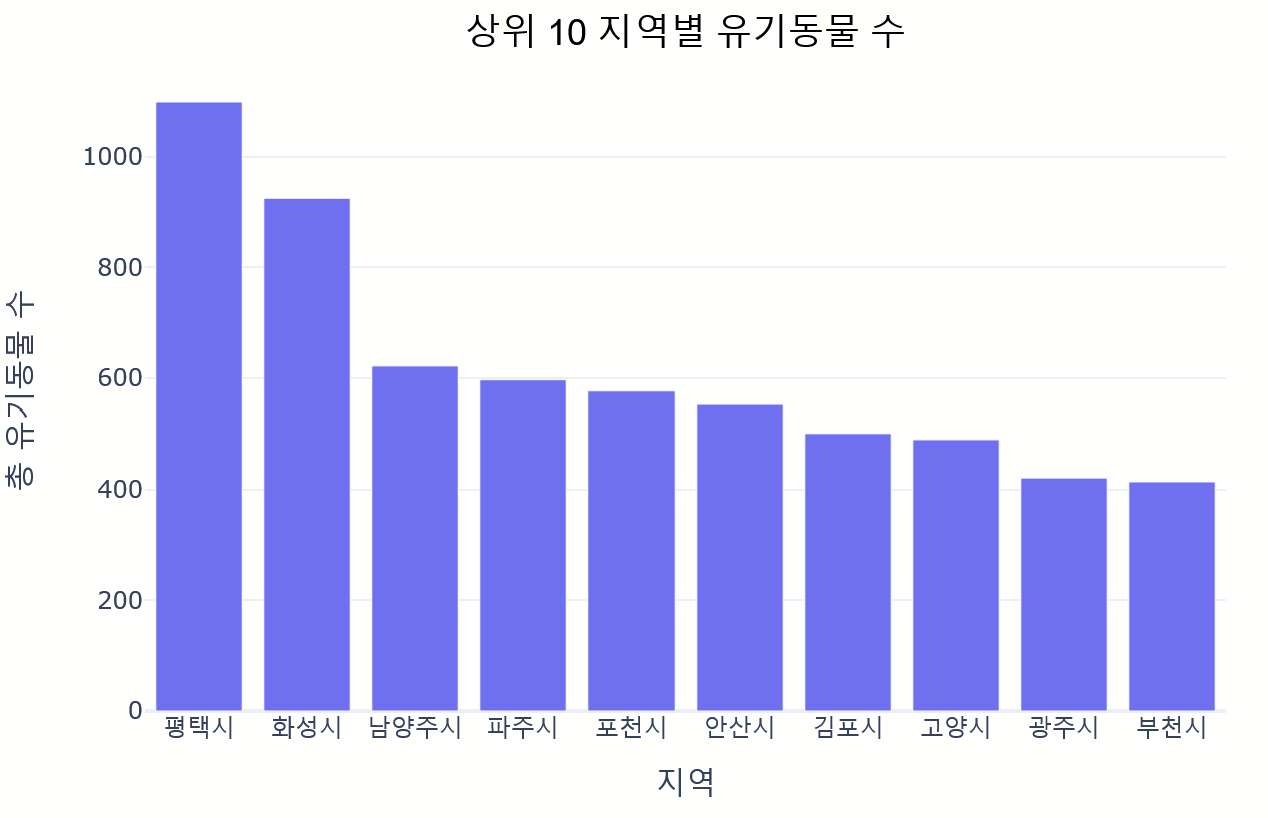
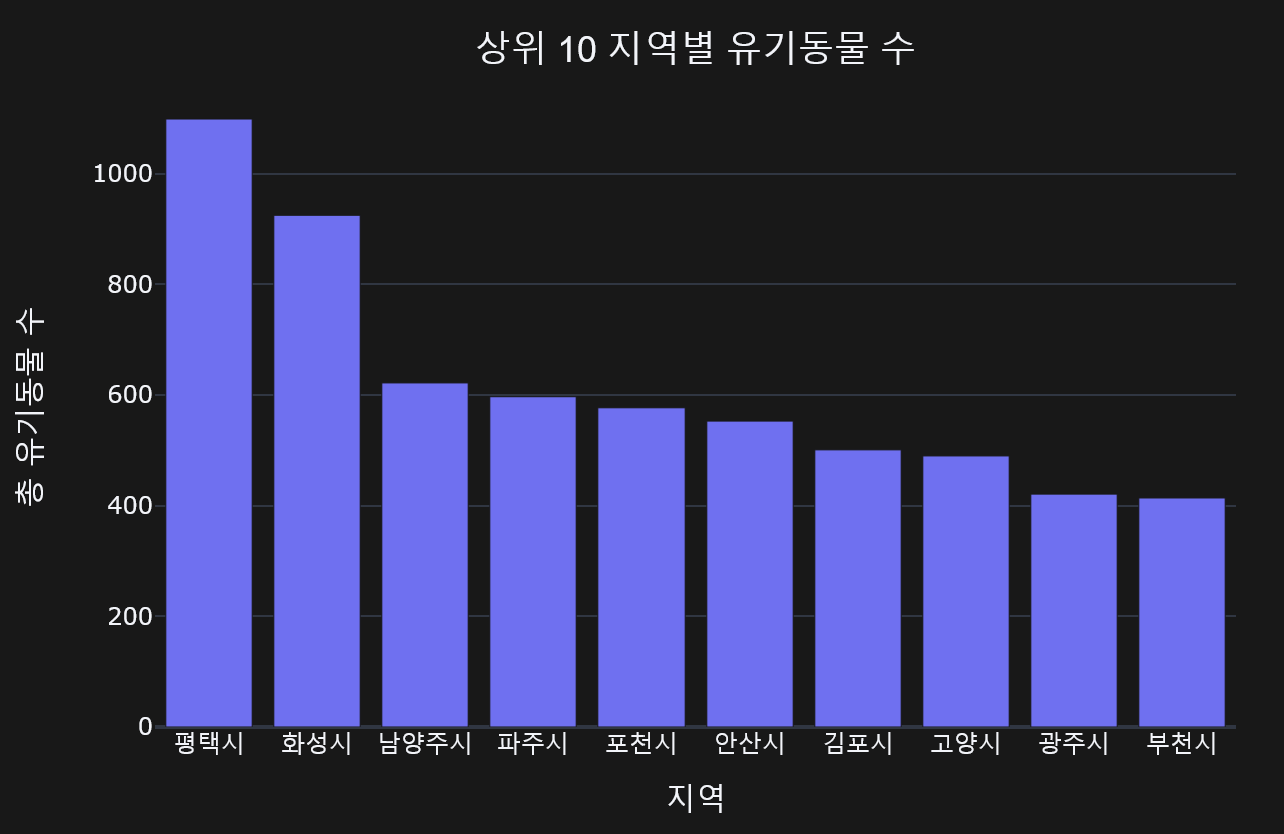
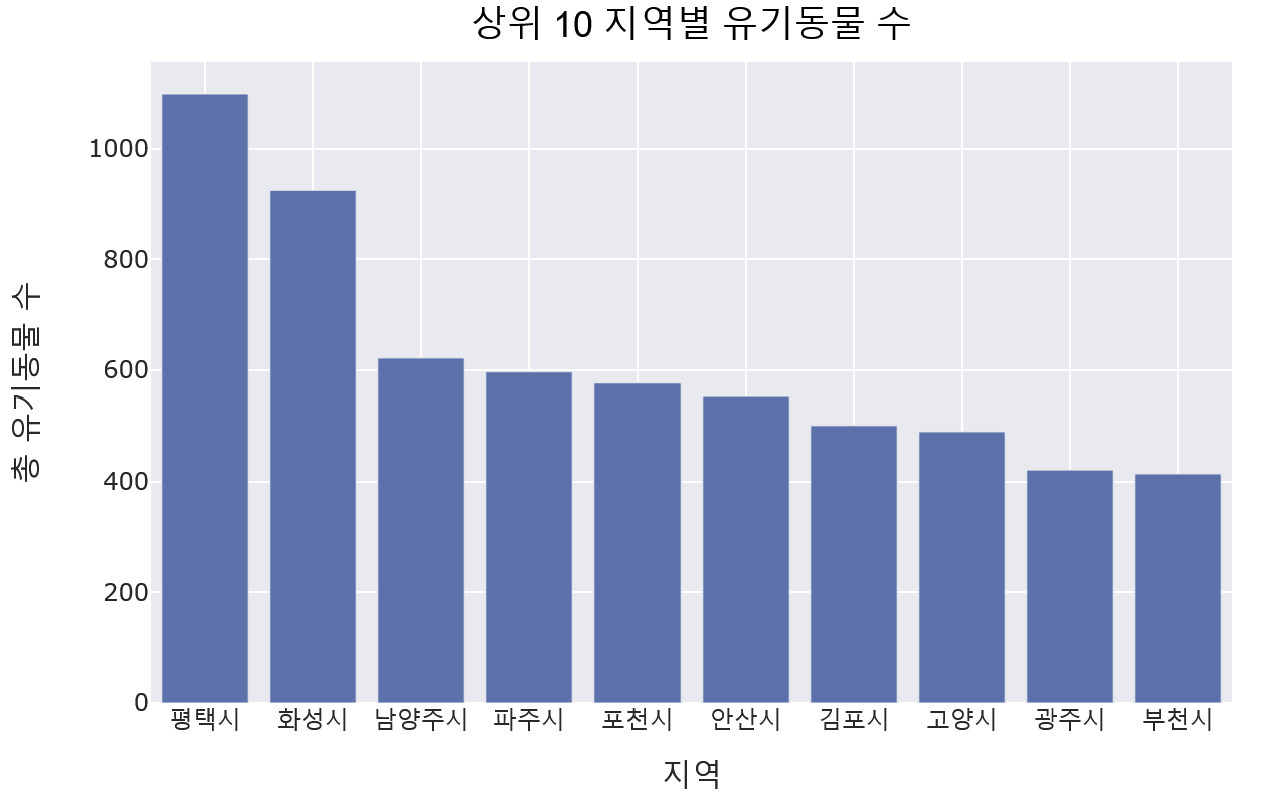
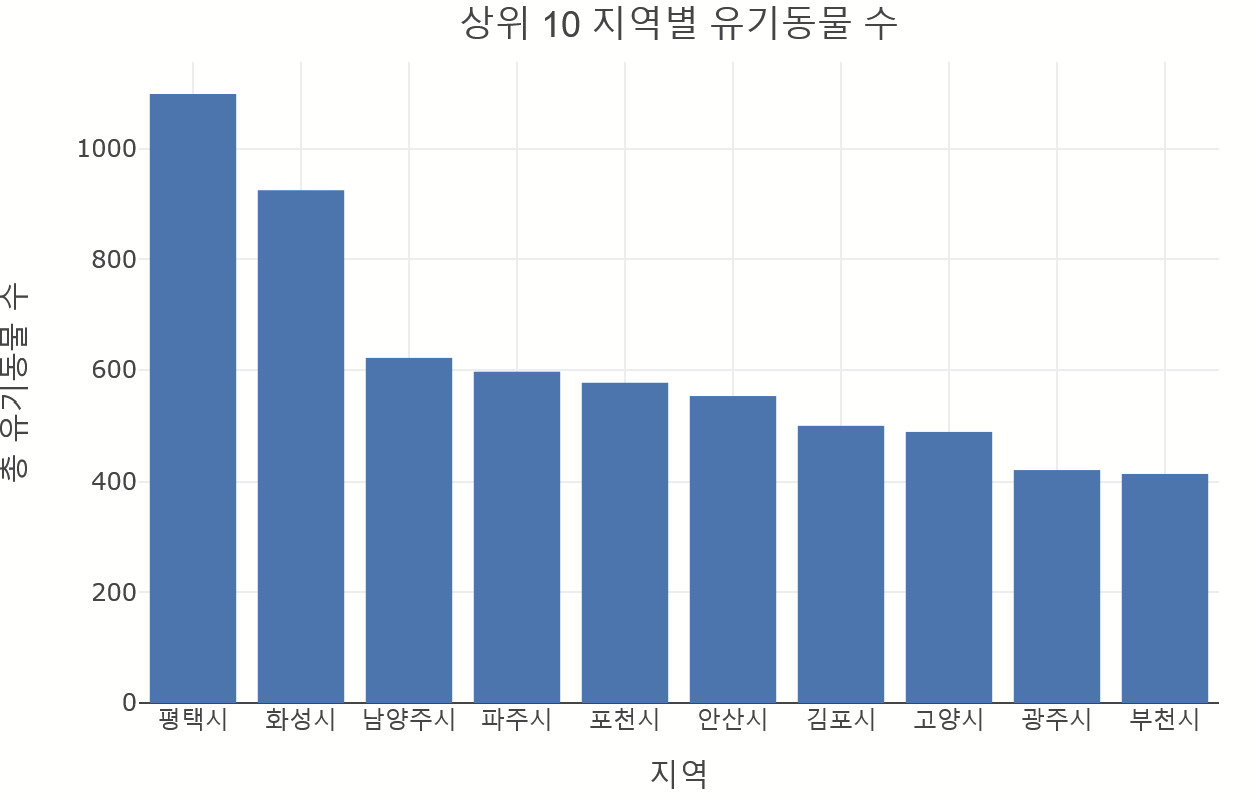
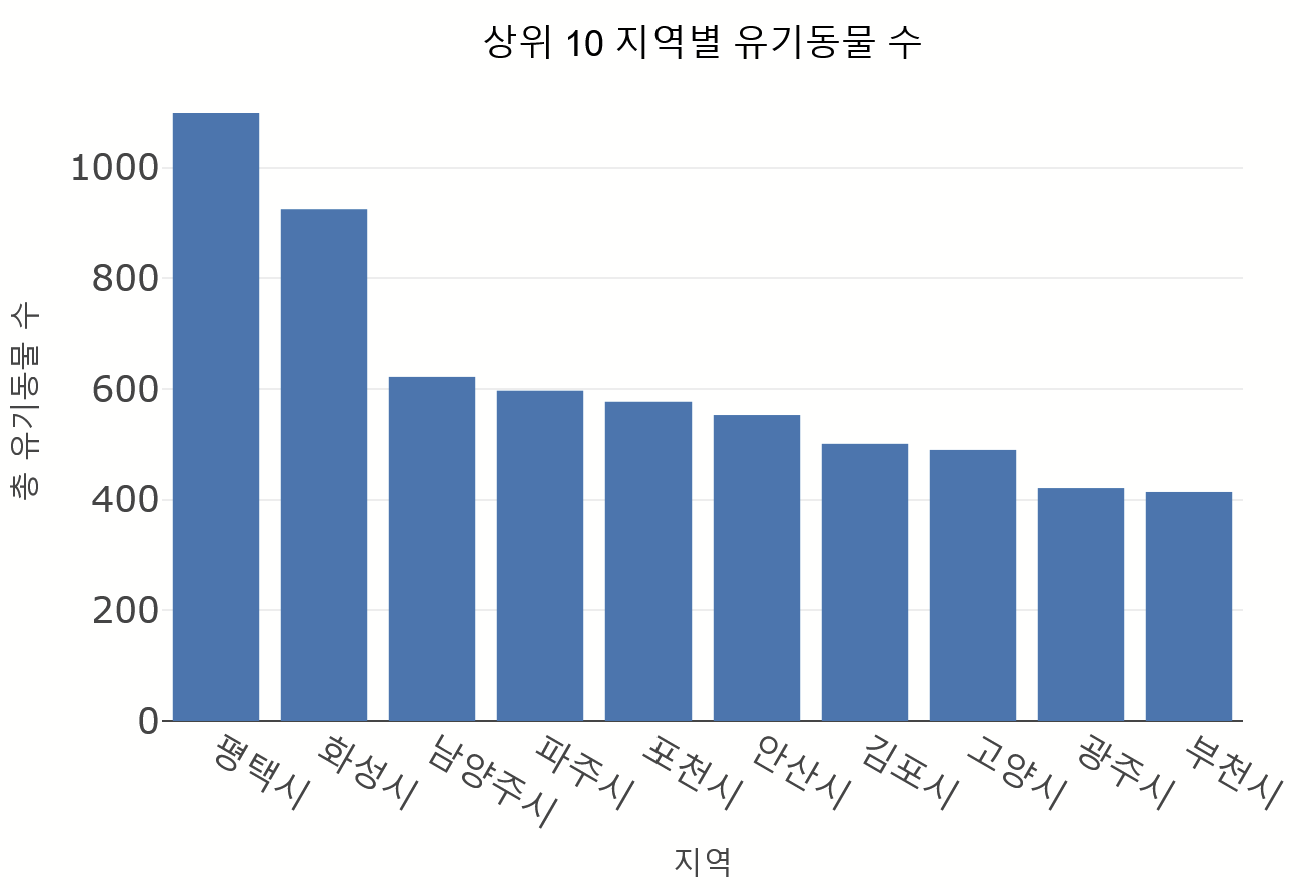
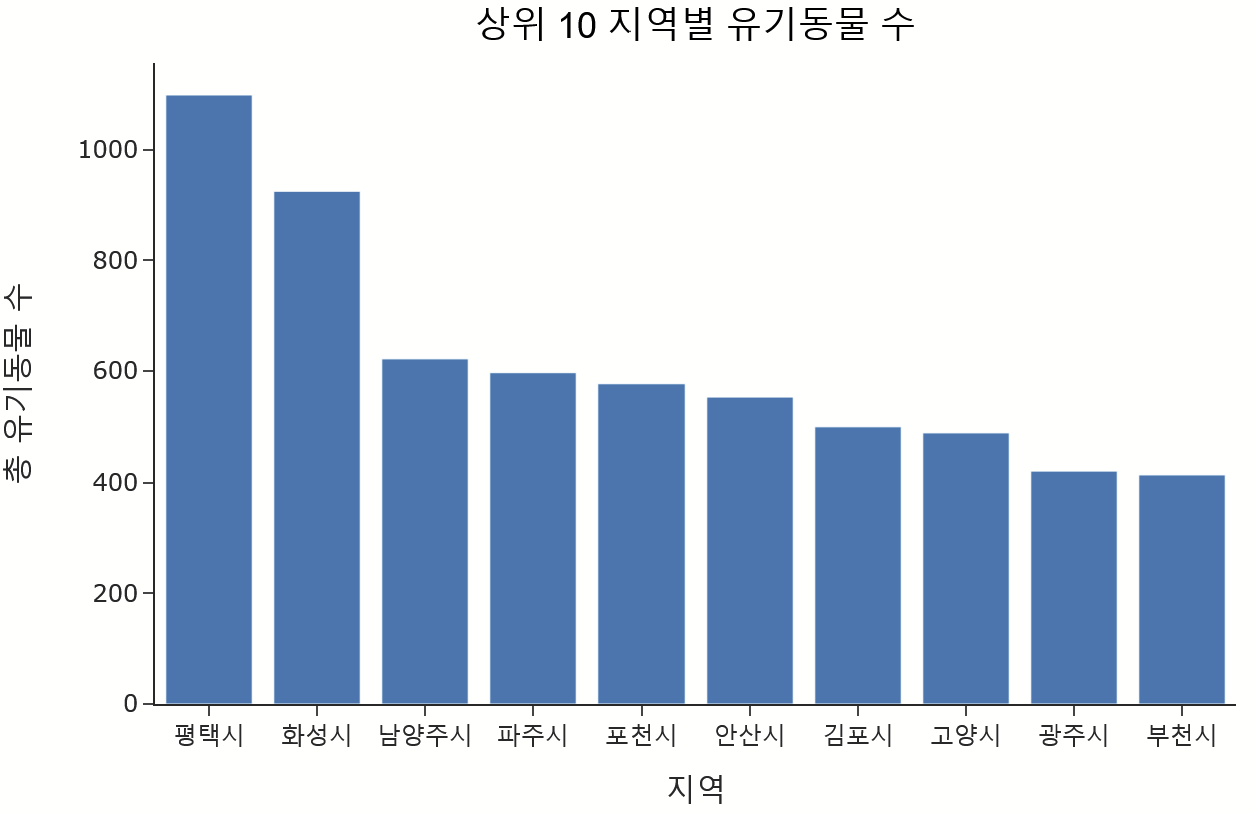
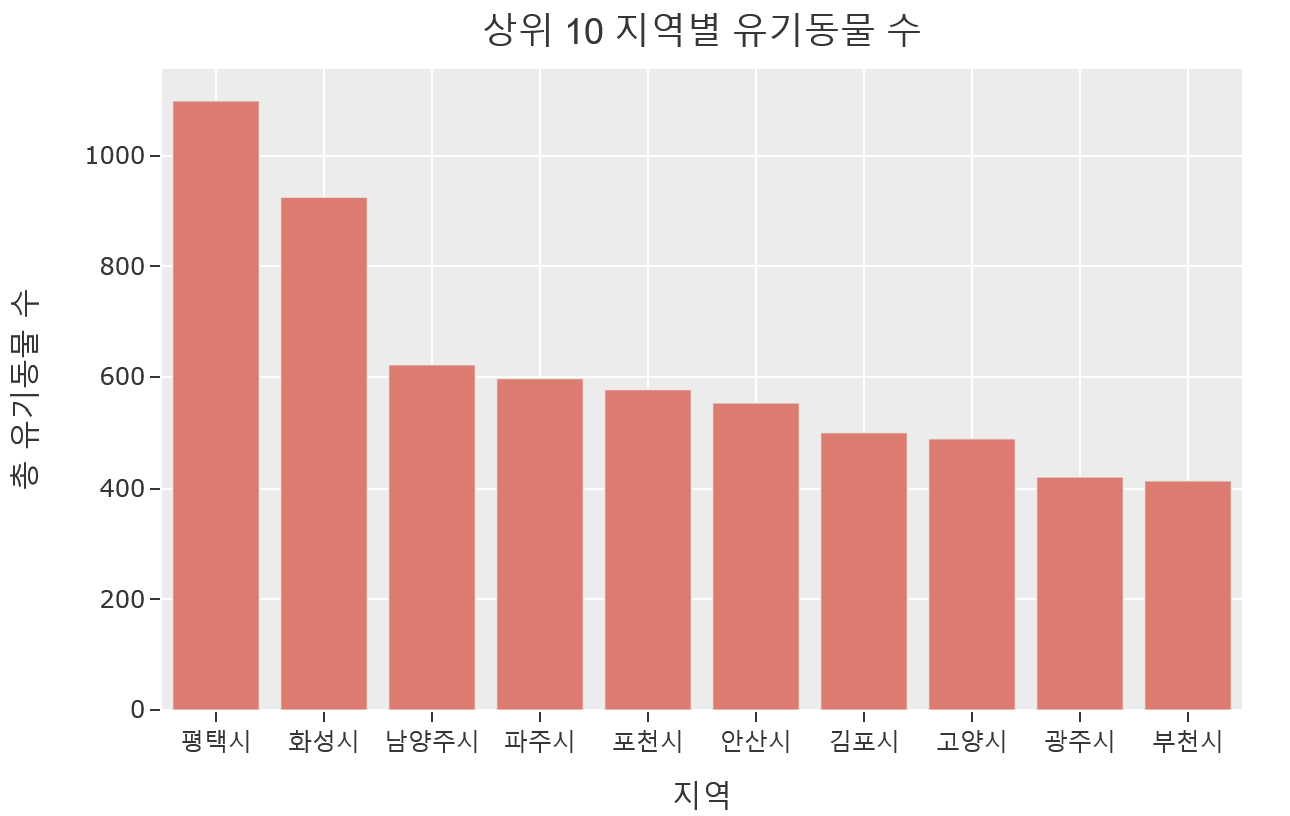
템플릿 종류
fig = px.bar(data_frame=region_top10, x='지역', y='총 유기동물 수',
             title = '상위10 지역별 유기동물 수', width=700, height=500, template = '템플릿명')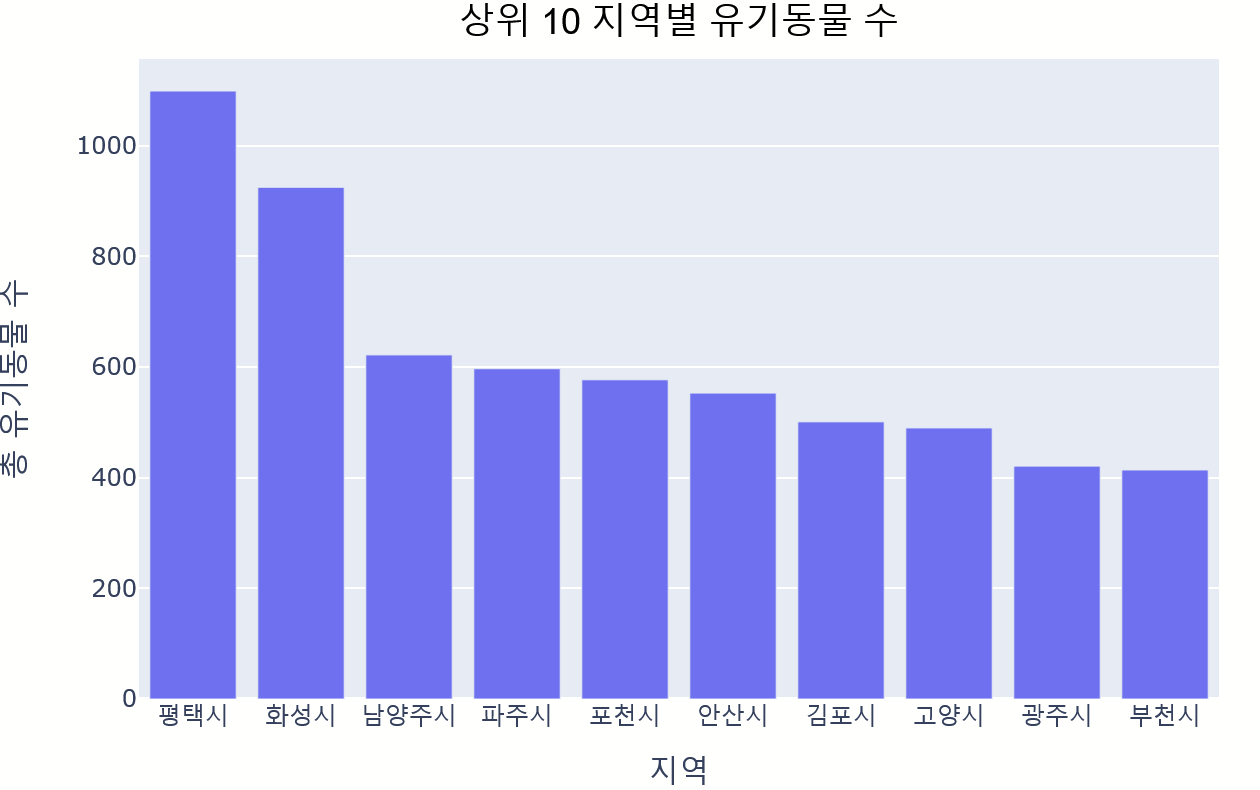
범례 적용
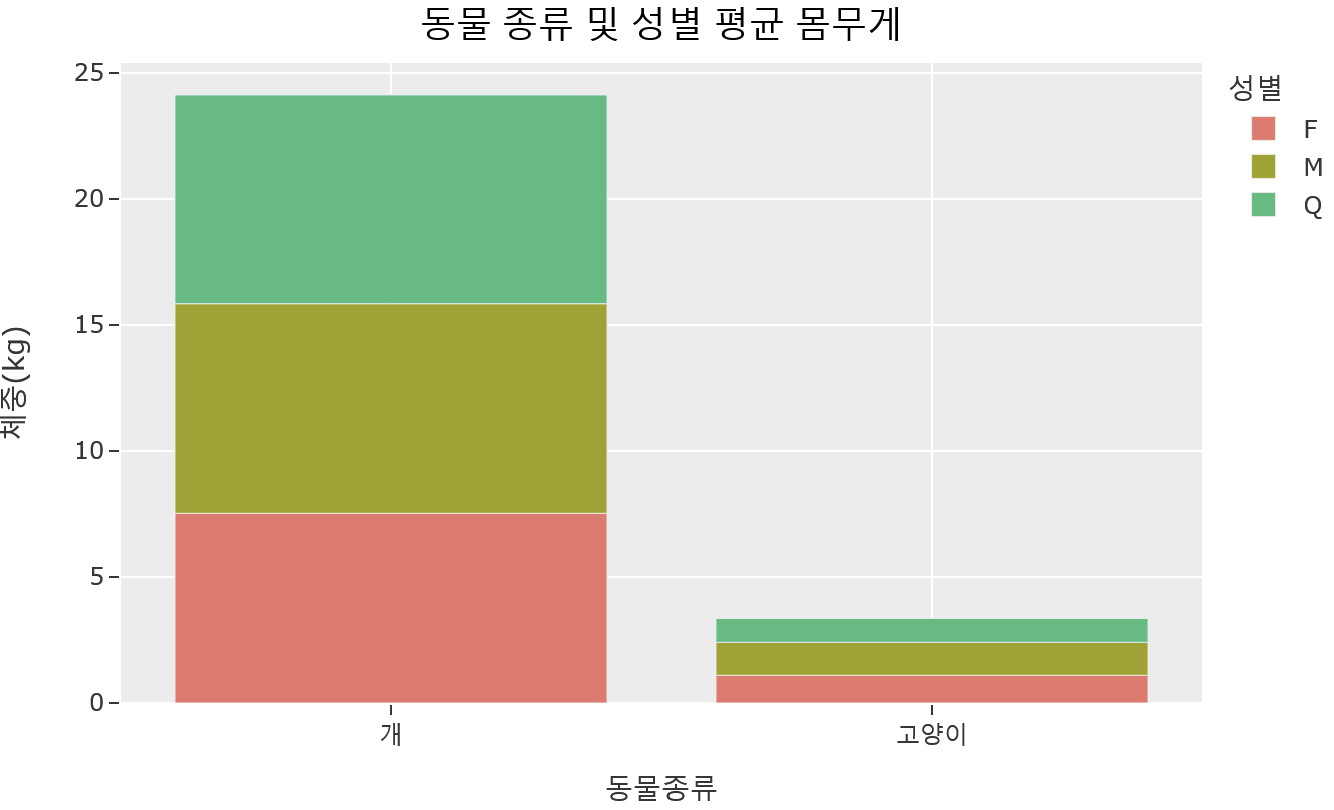
fig = px.bar(data_frame=df,x='동물종류', y='체중(kg)', color='성별',
             width=700, height=500, template='ggplot2')

# 레이아웃 설정
fig.update_layout(
    title={
        'text': '동물 종류 및 성별 평균 몸무게',
        'y': 0.92,
        'x': 0.5,
        'font': dict(size=18)
        'xanchor': 'center',
        'yanchor': 'top'
    }
)

fig.show()
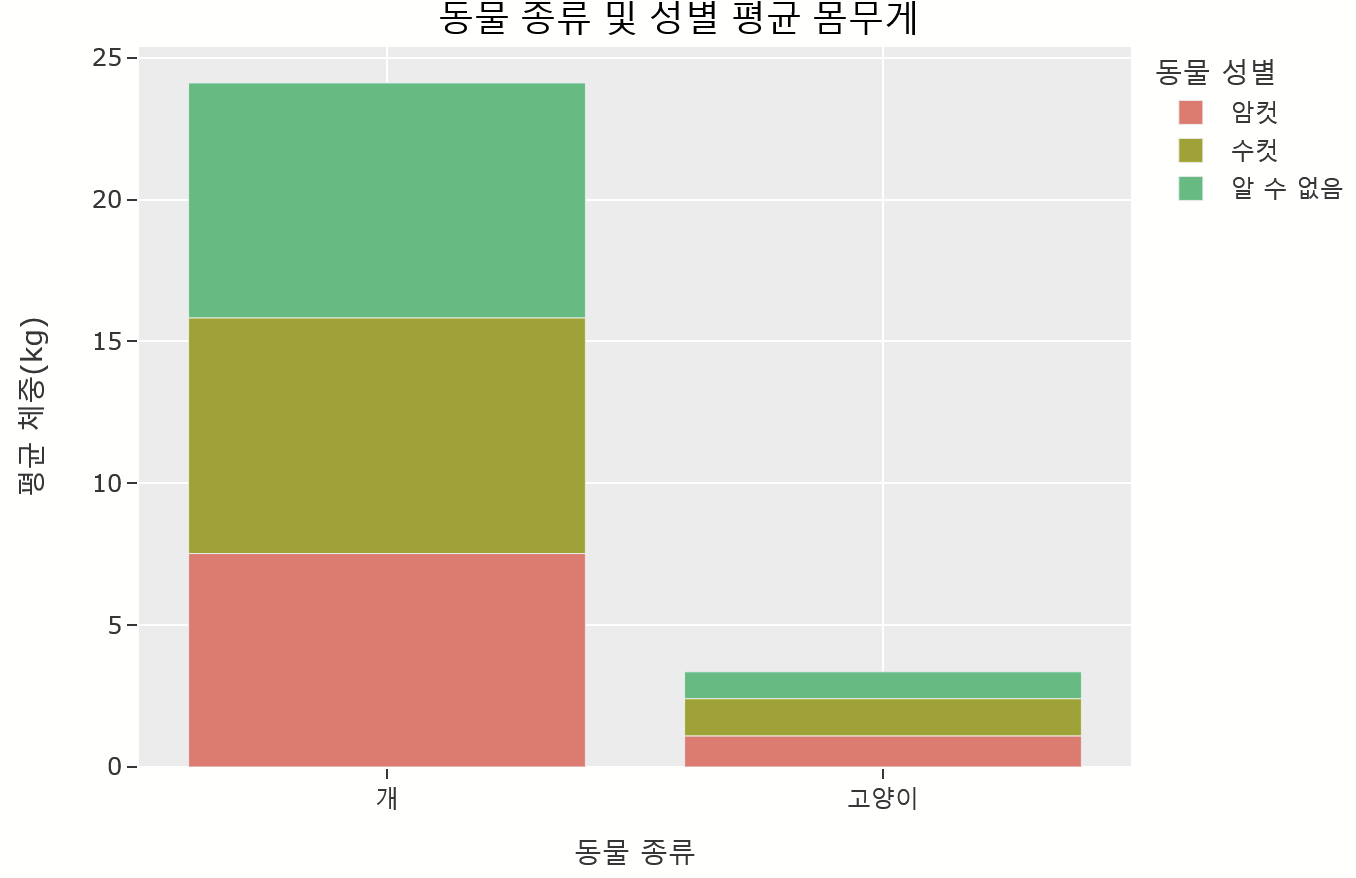
df['성별'] = df['성별'].replace({'F': '암컷', 'M': '수컷', 'Q': '알 수 없음'})

fig = px.bar(data_frame=df,x='동물종류', y='체중(kg)', color='성별',
             width=700, height=500, template='ggplot2',
             labels={'동물종류': '동물 종류', '체중(kg)': '평균 체중(kg)', '성별': '동물 성별'})

fig.update_layout(
    title={
        'text': '동물 종류 및 성별 평균 몸무게',
        'y': 0.92,
        'x': 0.5,
        'font': dict(size=18),
        'xanchor': 'center',
        'yanchor': 'top'
    }
)

fig.show()
※ Seaborn과 다르게 범례 지정시 그래프의 그 값이 합쳐져서 나온다.
각각 별게로 그래프에 나타내고 싶으면 아래처럼👇
# barmode를 그룹으로 지정해주면 된다.
fig = px.bar(data_frame=df,x='동물종류', y='체중(kg)', color='성별',
             width=700, height=500, template='ggplot2', barmode= 'group',
             labels={'동물종류': '동물 종류', '체중(kg)': '평균 체중(kg)', '성별': '동물 성별'})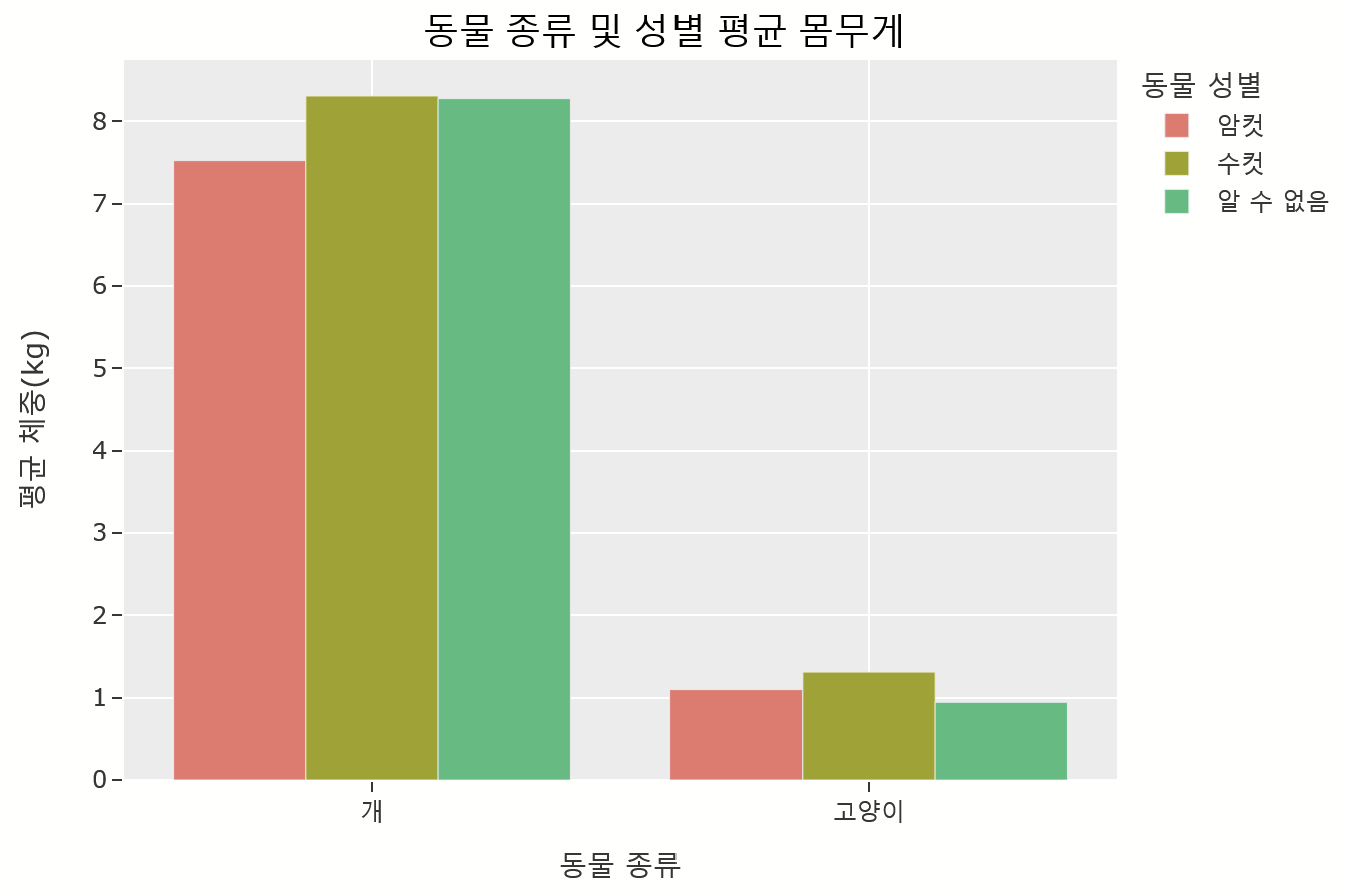
2. 선 그래프
기본 선 그래프

fig = px.line(data_frame=day, x= day['접수일자'].astype(str), y='카운트',title = '일별 유기견 수 추이')
fig.show()
선 그래프 - 스타일 커스터마이징

fig = px.line(data_frame=day, x= day['접수일자'].astype(str), y='카운트')
fig.update_traces(line=dict(color='#B1510F', width=2)) # 선 색상 지정 및 굵기 기정

fig.update_layout(
    title={
        'text': '일별 유기견 수 추이',
        'y': 0.93,  # y축 위치 (0.0 ~ 1.0)
        'x': 0.5,  # x축 위치 (0.0 ~ 1.0)
        'xanchor': 'center',
        'yanchor': 'top'
    },
    xaxis_title='날짜',
    yaxis_title='유기견 수',
    paper_bgcolor='#EBE6E1', # 그래프 외부의 배경색 설정
    plot_bgcolor='rgba(240, 240, 240, 0.5)' # 그래프 내부 배경색 설정
)

fig.show()
범례 적용
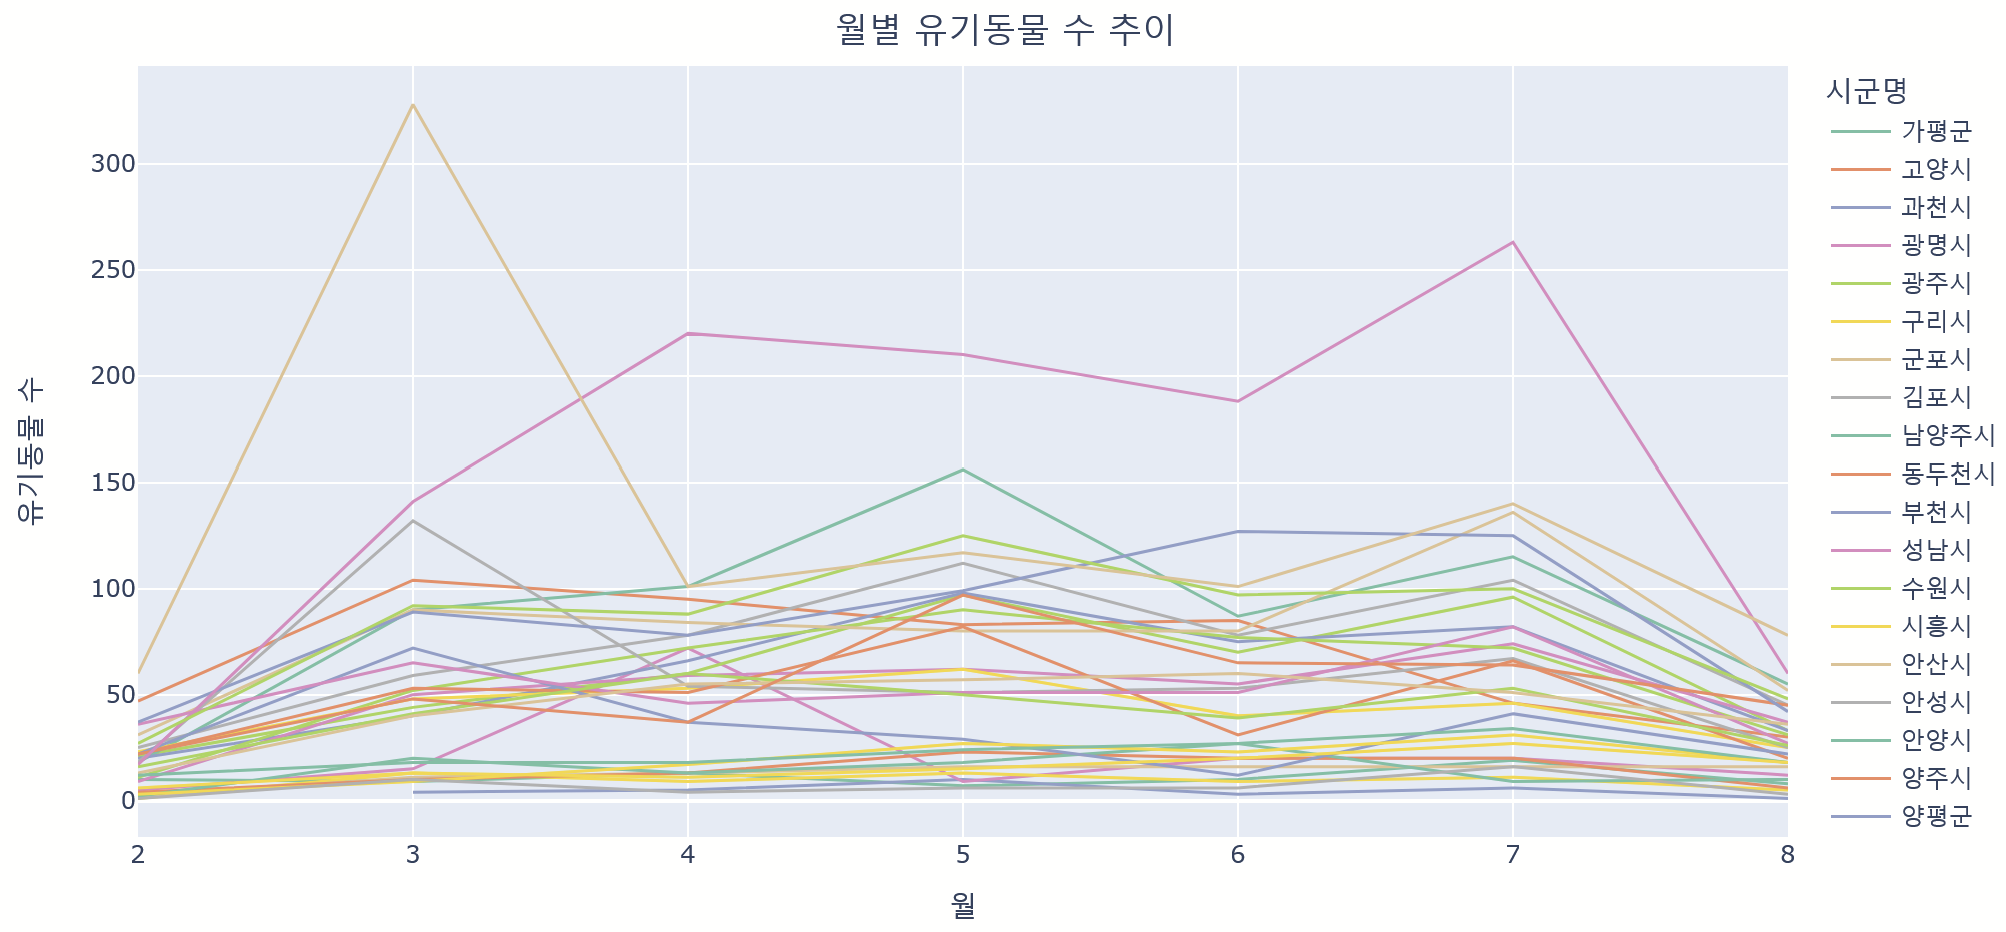
fig = px.line(data_frame=df, x= '접수월', y='유기동물 수', color= '시군명', color_discrete_sequence=px.colors.qualitative.Set2)
fig.update_traces(line=dict(width=1.5))

fig.update_layout(
    title={
        'text': '월별 유기동물 수 추이',
        'y': 0.93,
        'x': 0.5,
        'xanchor': "center",
        'yanchor': "top"
    },
    xaxis_title='월',
    yaxis_title='유기동물 수'
)

fig.show()
3. 산점도 그래프
산점도 그래프는 그 유명한 펭귄 데이터를 활용해보자.
searborn을 통해 데이터셋을 쉽게 가져올 수 있다.

import seaborn as sns

df = sns.load_dataset('penguins')
기본 산점도 그래프

fig = px.scatter(data_frame=penguins, x='bill_length_mm', y='bill_depth_mm', title= '부리 길이에 따른 부리 깊이',
                 labels={'bill_length_mm': '부리 길이(mm)', 'bill_depth_mm': '부리 깊이(mm)'}, width=700, height=500)
fig.show()
산점도 그래프 - 스타일 커스터마이징

fig = px.scatter(data_frame=penguins, x='bill_length_mm', y='bill_depth_mm',
                 labels={'bill_length_mm': '부리 길이(mm)', 'bill_depth_mm': '부리 깊이(mm)'},
                 width=700, height=500, template='plotly_white')
fig.update_traces(marker=dict(color='#F8766D', size = 8)) # 점 색, 크기 변경

fig.update_layout(
    title={
        'text': '부리 길이에 따른 부리 깊이',
        'y': 0.93,
        'x': 0.5,
        'xanchor': 'center',
        'yanchor': 'top'
    }
)

fig.show()
이처럼 기본으로 점의 크기를 변경할 수도 있지만, 다른 컬럼값에 따라 점의 크기를 변경하는 것 또한 가능하다.👇
컬럼값에 따른 점의 크기 변경

# size를 사용하면 된다.
# 어떤 컬럼값에 따라 크기를 변경시켜줄 것인지 그 컬럼명을 적으면 된다.
penguins = penguins.dropna() # size 사용 위해 NaN있는 행 제거

fig = px.scatter(data_frame=penguins, x='bill_length_mm', y='bill_depth_mm',
                 labels={'bill_length_mm': '부리 길이(mm)', 'bill_depth_mm': '부리 깊이(mm)'},
                 size = 'body_mass_g',
                 width=700, height=500, template='plotly_white')
점의 크기가 너무 부담스러우면 최대 크기(size_max)를 지정해줘서 크기에 제한점을 두면 된다. 👇
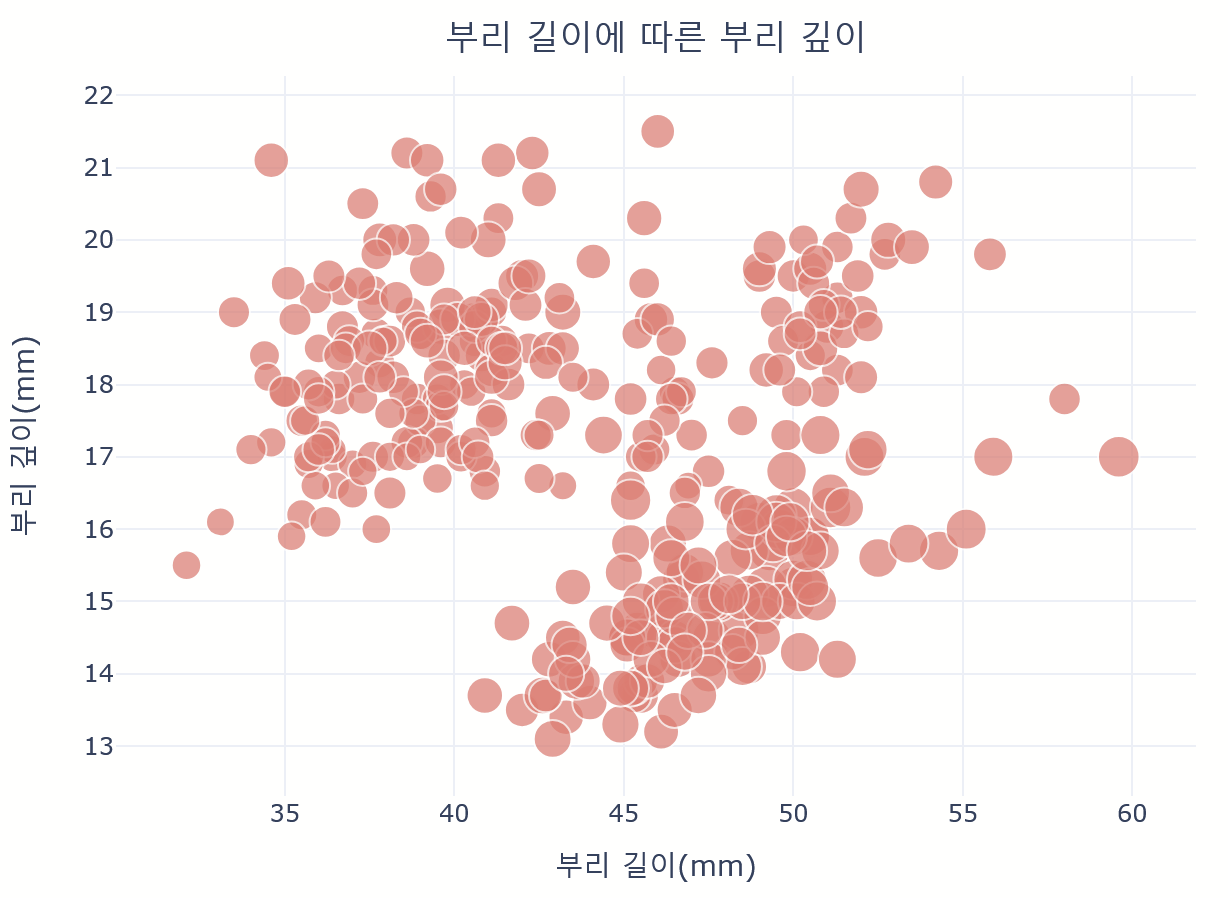
fig = px.scatter(data_frame=penguins, x='bill_length_mm', y='bill_depth_mm',
                 labels={'bill_length_mm': '부리 길이(mm)', 'bill_depth_mm': '부리 깊이(mm)'},
                 size = 'body_mass_g', size_max = 15,
                 width=700, height=500, template='plotly_white')
범례 적용
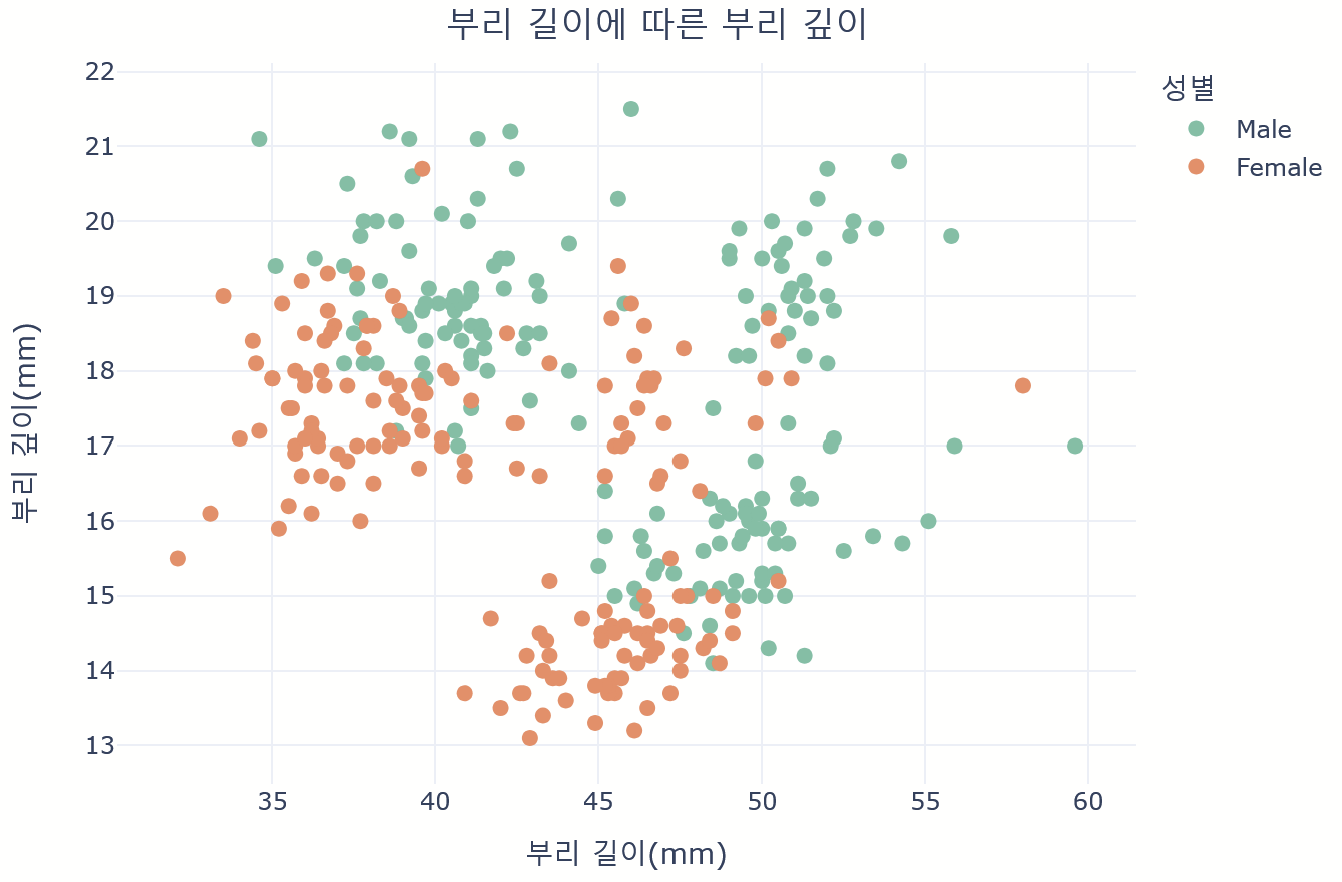
fig = px.scatter(data_frame=penguins, x='bill_length_mm', y='bill_depth_mm', color='sex',
                 labels={'bill_length_mm': '부리 길이(mm)', 'bill_depth_mm': '부리 깊이(mm)','sex':'성별'},
                 color_discrete_sequence=px.colors.qualitative.Set2,
                 width=700, height=500, template='plotly_white')
fig.update_traces(marker=dict(size = 8))
점 스타일 지정하기
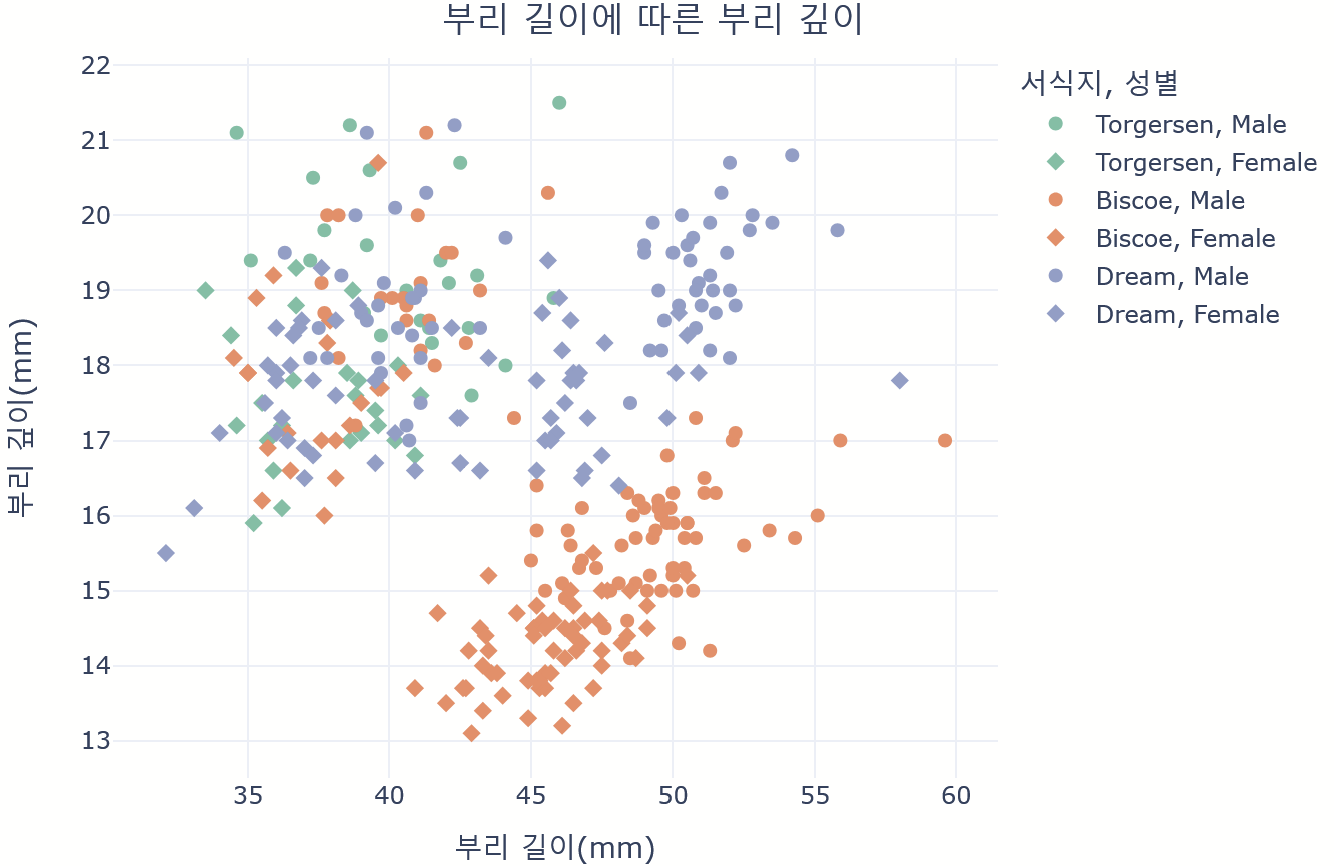
fig = px.scatter(data_frame=penguins, x='bill_length_mm', y='bill_depth_mm', color = 'island', symbol='sex',
                 labels={'bill_length_mm': '부리 길이(mm)', 'bill_depth_mm': '부리 깊이(mm)','sex':'성별', 'island' : '서식지'},
                 color_discrete_sequence=px.colors.qualitative.Set2,
                 width=700, height=500, template='plotly_white')
fig.update_traces(marker=dict(size = 7))
※ seaborn에서는 style로 스타일을 지정해줬는데, plotly에서는 symbol로 지정해준다.
그래프 나눠서 나타내기
한 컬럼을 기준으로 그래프를 나눠서 그려줄 수 도 있다. 👇
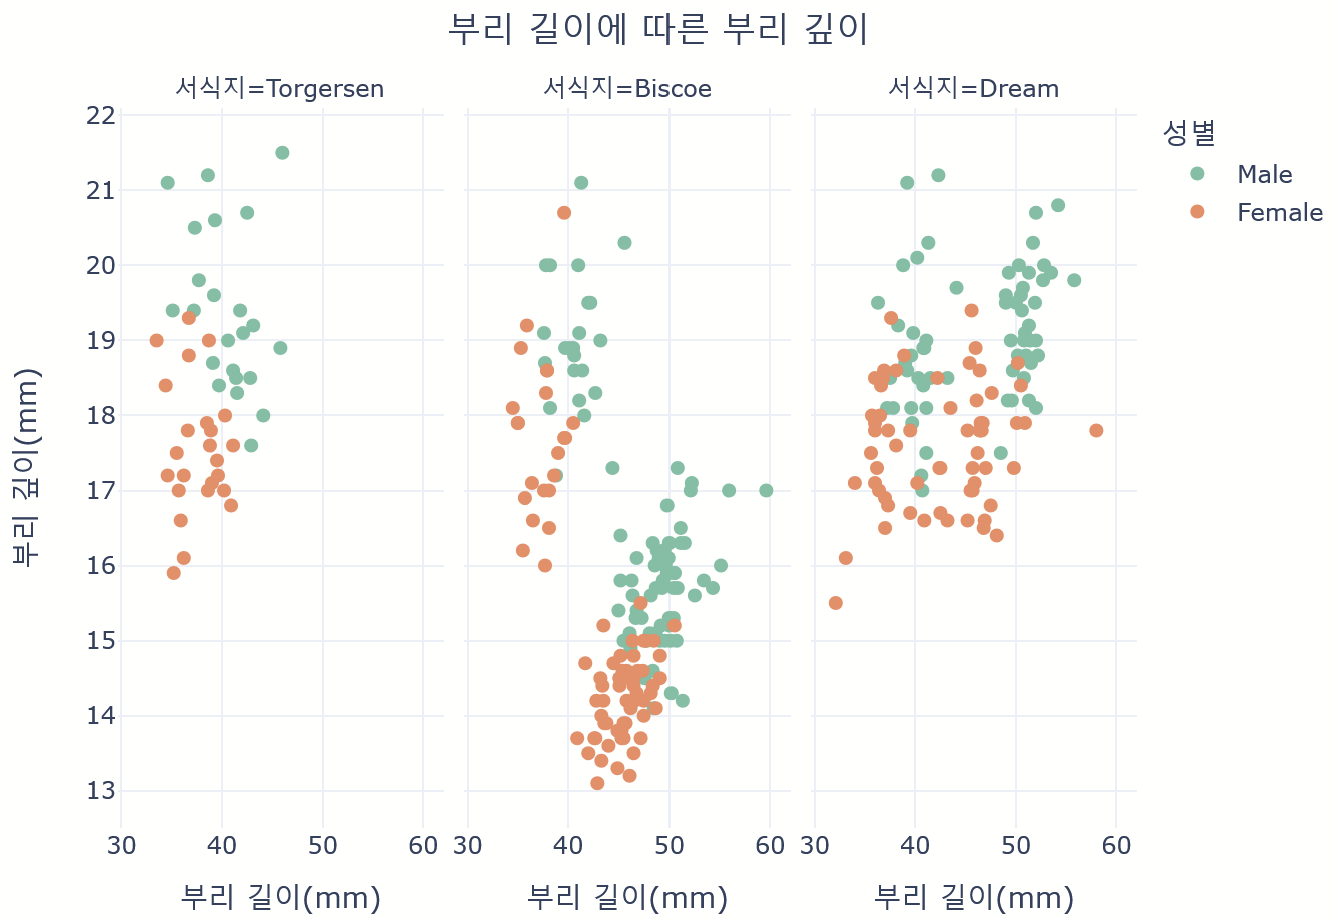
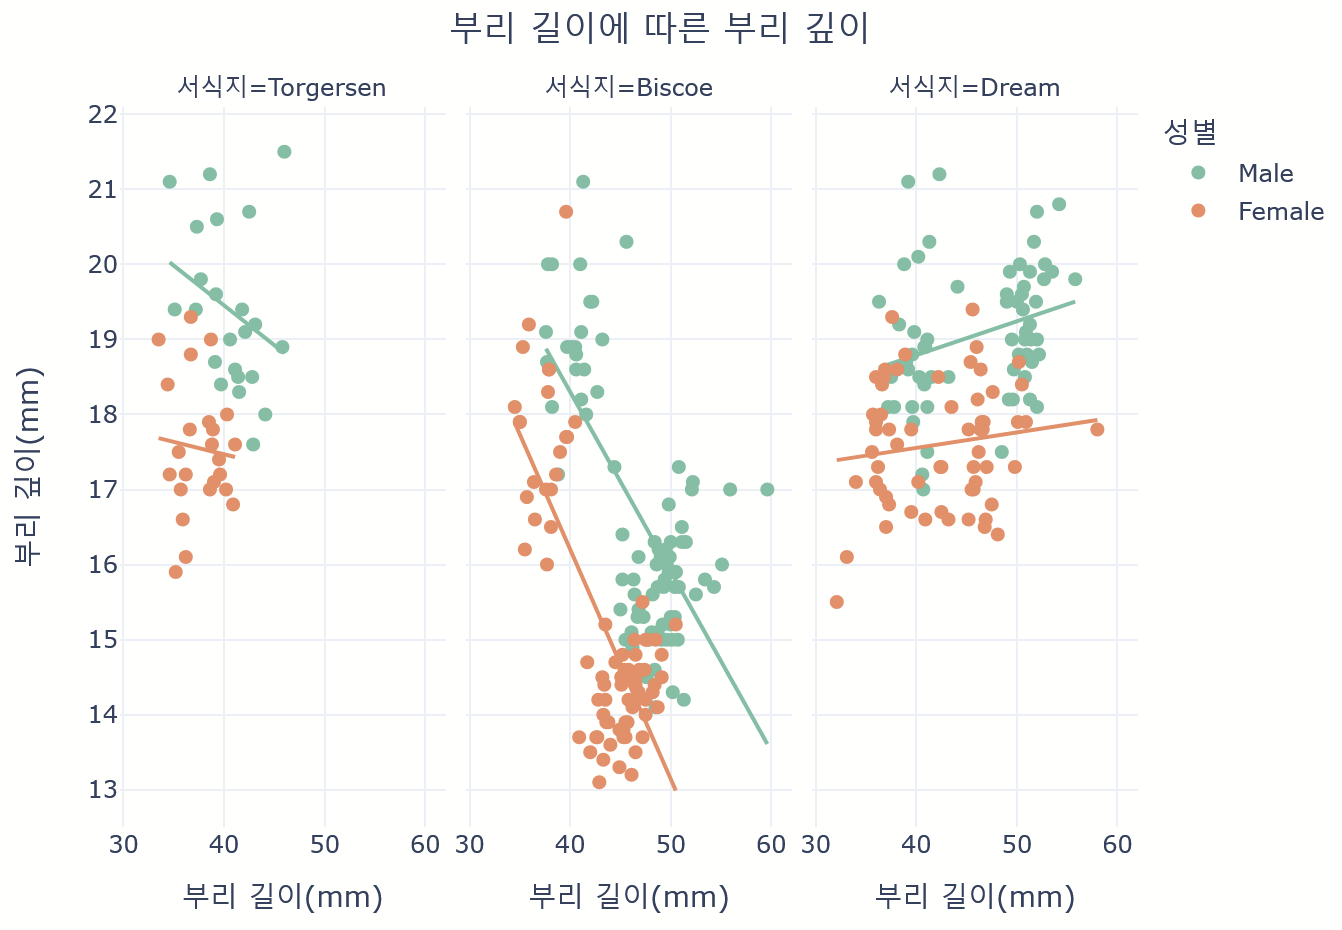
fig = px.scatter(data_frame=penguins, x='bill_length_mm', y='bill_depth_mm', color='sex',  facet_col='island',
                 labels={'bill_length_mm': '부리 길이(mm)', 'bill_depth_mm': '부리 깊이(mm)','sex':'성별', 'island' : '서식지'},
                 color_discrete_sequence=px.colors.qualitative.Set2,
                 width=700, height=500, template='plotly_white')
fig.update_traces(marker=dict(size = 7))

fig.update_layout(
    title={
        'text': '부리 길이에 따른 부리 깊이',
        'y': 0.97,
        'x': 0.5,
        'xanchor': 'center',
        'yanchor': 'top'
    }
)

fig.show()
선형 회귀선 추가하기
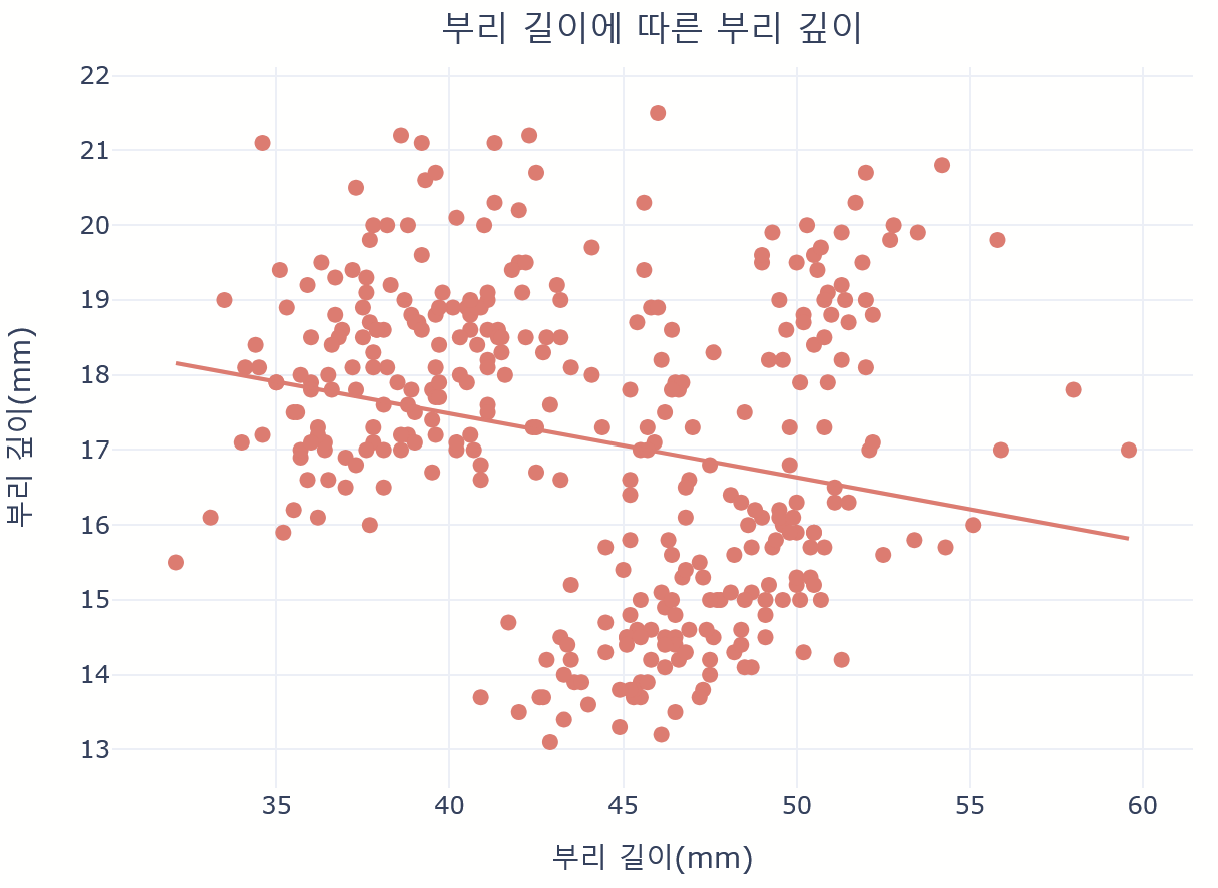
fig = px.scatter(data_frame=penguins, x='bill_length_mm', y='bill_depth_mm', trendline='ols',
                 labels={'bill_length_mm': '부리 길이(mm)', 'bill_depth_mm': '부리 깊이(mm)'},
                 width=700, height=500, template='plotly_white')
회귀선 스타일 변경
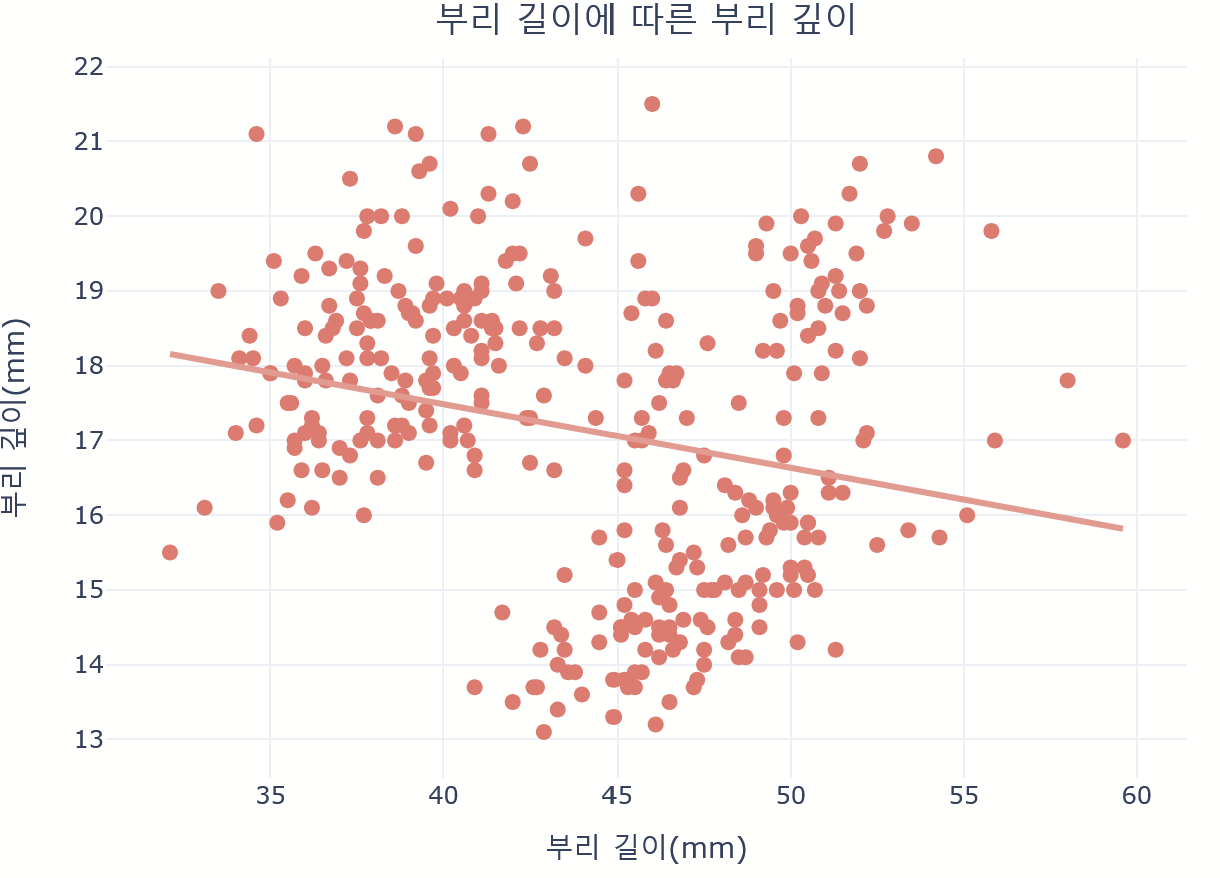
fig = px.scatter(data_frame=penguins, x='bill_length_mm', y='bill_depth_mm', trendline='ols',
                 labels={'bill_length_mm': '부리 길이(mm)', 'bill_depth_mm': '부리 깊이(mm)'},
                 width=700, height=500, template='plotly_white')

fig.update_traces(marker=dict(color='#F8766D', size=8),line=dict(color='#FA9890', width=3))
범례가 사용된 경우, 범례에 따라 별도로 회귀선이 그려지게 된다.👇

4. 히스토그램
기본 히스토그램

fig = px.histogram(data_frame=animals_weight, x='체중(kg)',
                   color_discrete_sequence=px.colors.qualitative.Set2,
                   title='히스토그램', width=600, height=500)
fig.show()
히스토그램- 스타일 커스터마이징

fig = px.histogram(data_frame=animals_weight, x='체중(kg)', color_discrete_sequence=px.colors.qualitative.Set2,
                   template='plotly_white', width=600, height=500)
fig.update_traces(marker=dict(line=dict(color='gray', width=1))) # 막대기에 윤곽선 추가

fig.update_layout(
    title={
        'text': '히스토그램',
        'y': 0.90,
        'x': 0.5,
        'xanchor': 'center',
        'yanchor': 'top'
    },
    yaxis_title='유기동물 수'
)

fig.show()
5. 박스 플롯(상자 수염 차트, 상자 그림)
기본 박스 플롯
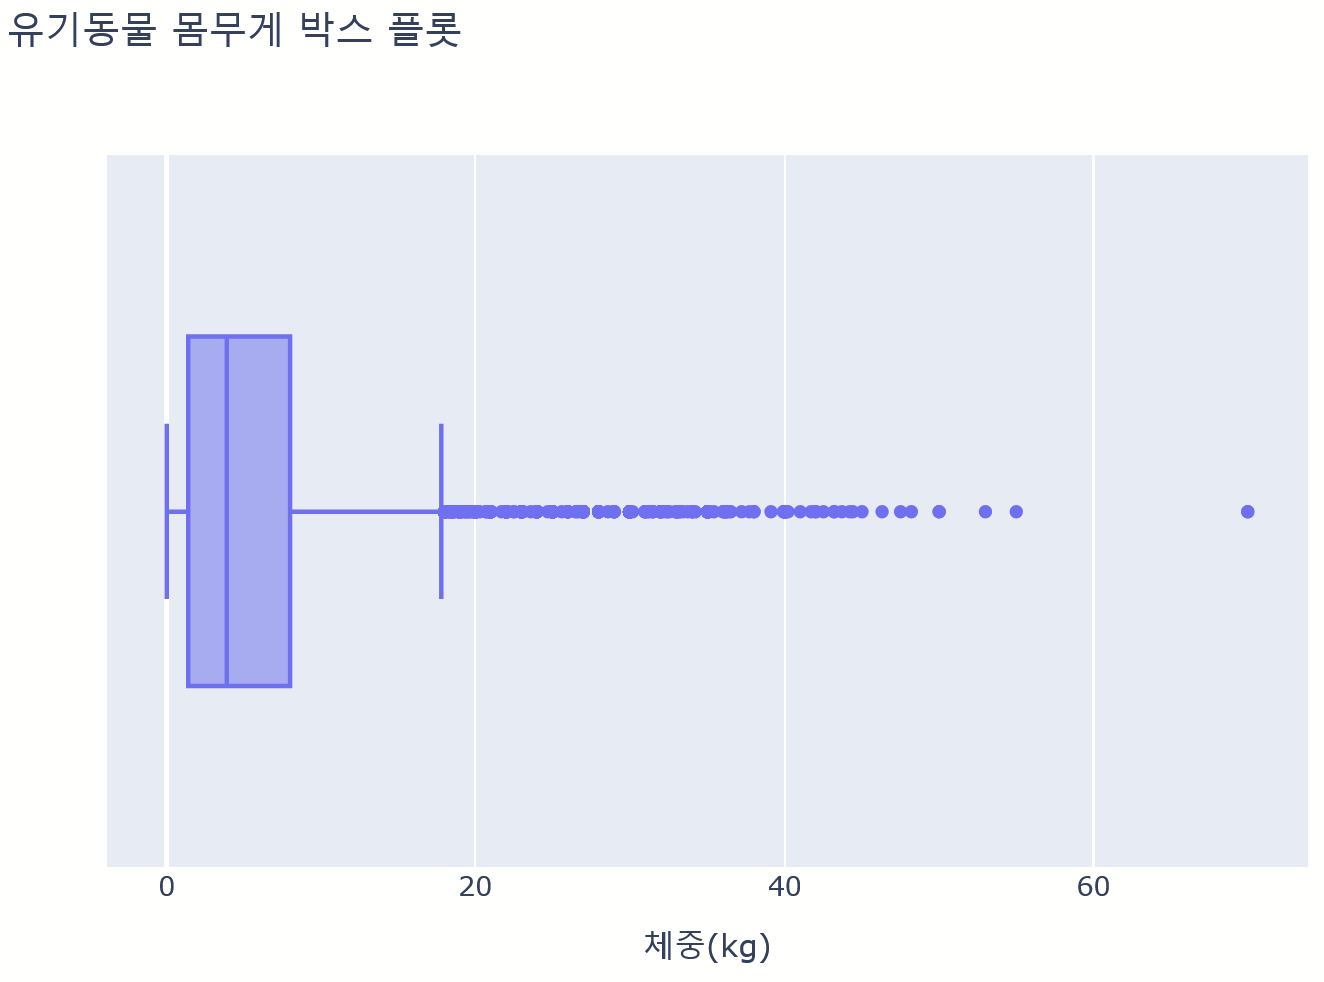
fig = px.box(data_frame=data, x='체중(kg)', title='유기동물 몸무게 박스 플롯', width=700, height=500)
fig.show()
박스 플롯- 스타일 커스터마이징
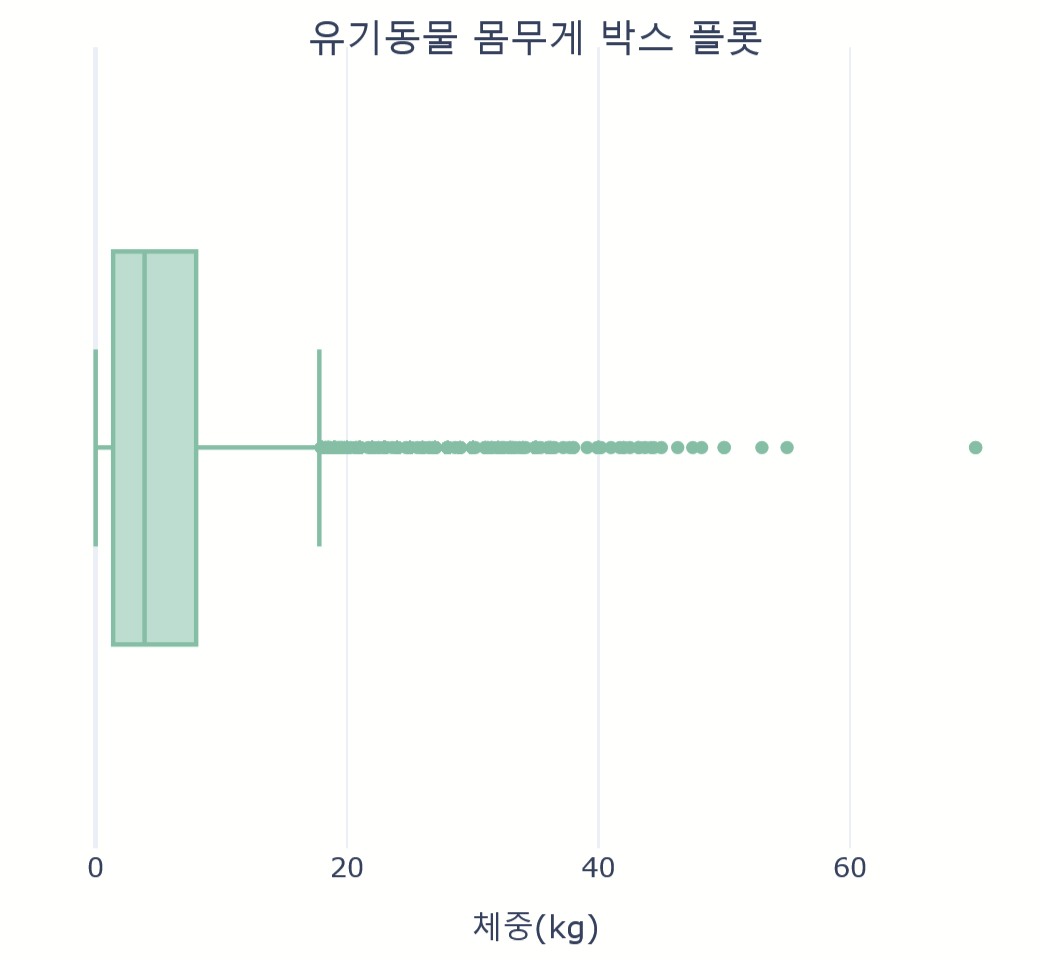
fig = px.box(data_frame=data, x='체중(kg)', color_discrete_sequence=px.colors.qualitative.Set2,
                   template='plotly_white', width=600, height=500)

fig.update_layout(
    title={
        'text': '유기동물 몸무게 박스 플롯',
        'y': 0.90,
        'x': 0.5,
        'xanchor': 'center',
        'yanchor': 'top'
    }
)

fig.show()
범례 적용
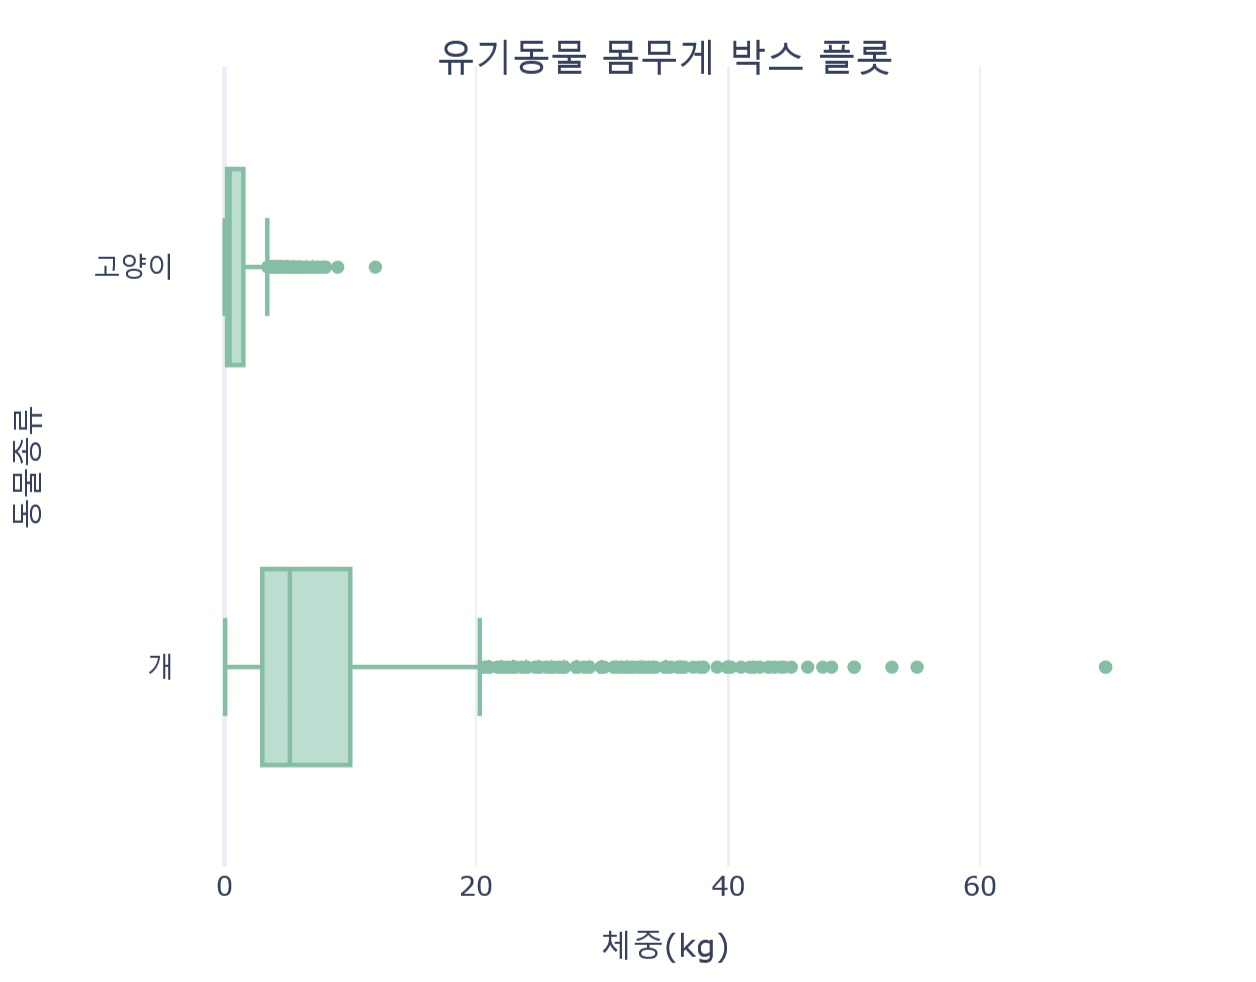
fig = px.box(data_frame=data, x='체중(kg)', y= '동물종류',
             color_discrete_sequence=px.colors.qualitative.Set2,
             template='plotly_white', width=600, height=500)
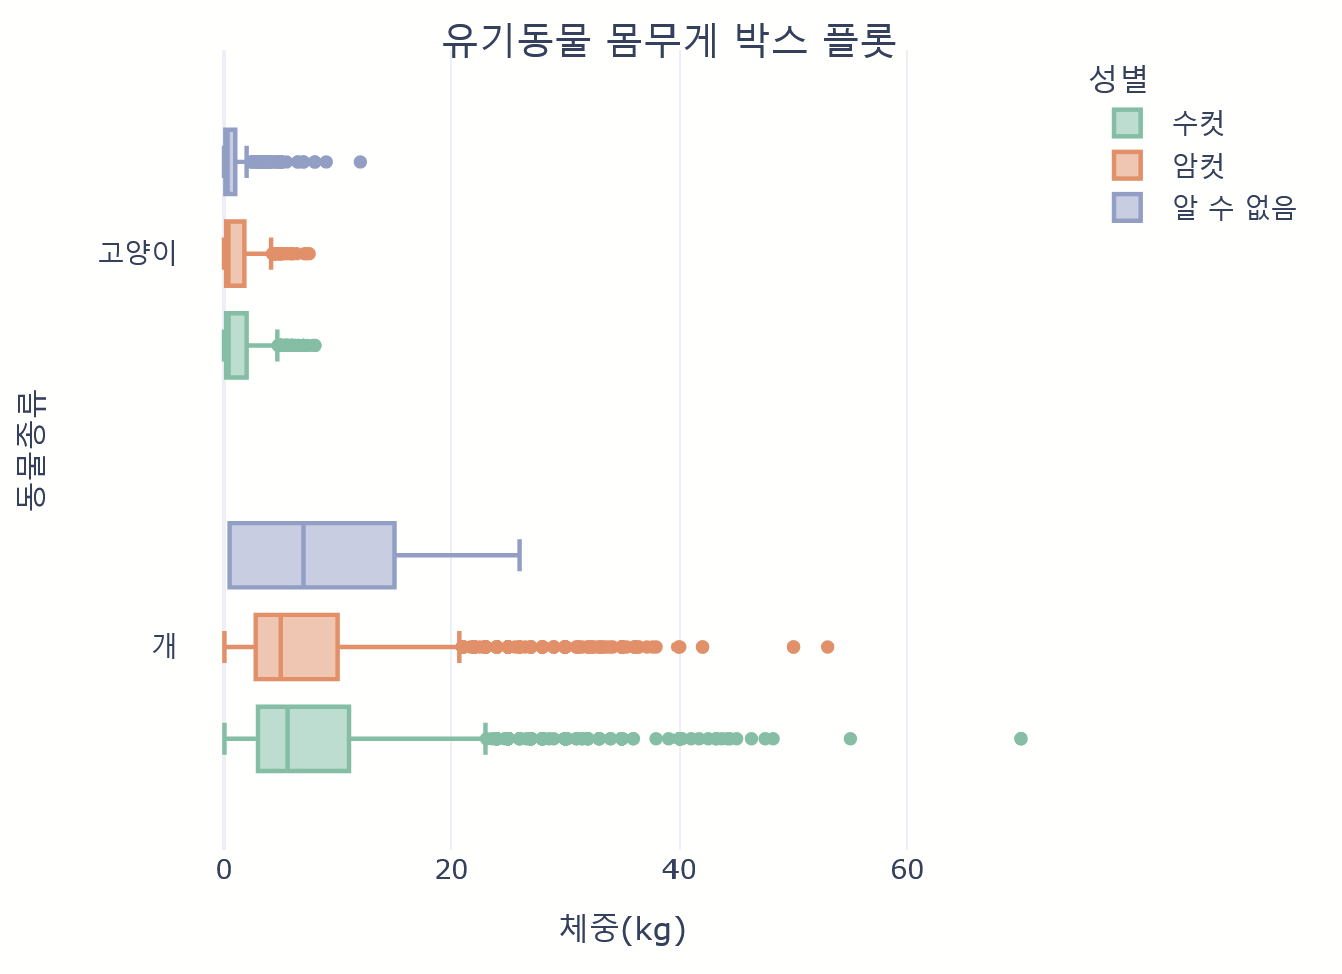
data['성별'] = data['성별'].replace({'F': '암컷', 'M': '수컷', 'Q': '알 수 없음'})

fig = px.box(data_frame=data, x='체중(kg)', y= '동물종류', color= '성별',
            color_discrete_sequence=px.colors.qualitative.Set2,
            template='plotly_white', width=600, height=500)
6. 파이 차트
기본 파이 차트

fig = px.pie(data_frame=age, names='나이', values='비율', title='유기동물 나이별 비율')
fig.show()
파이 차트- 스타일 커스터마이징
※ plotly.express 모듈에서 그래프의 스타일을 지정할 수 있는 옵션들은 제공하지 않는다,
※ 세부 설정은 plotly.graph_objects의 go.Figure를 통해 가능하다.
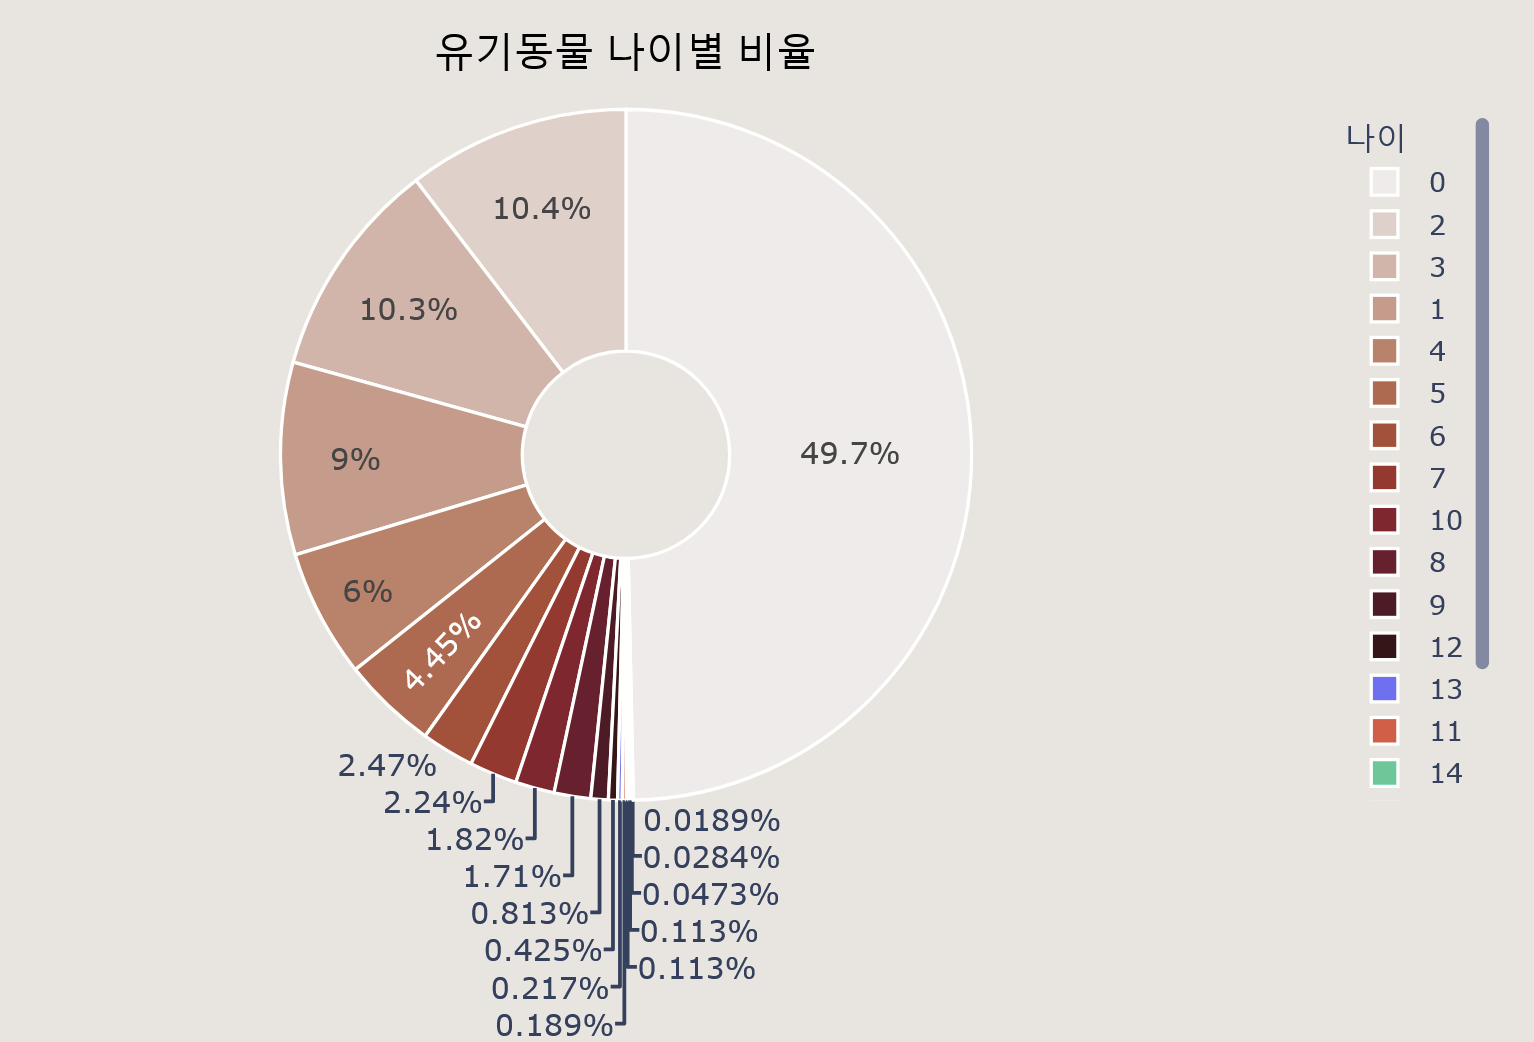
import plotly.graph_objects as go

fig = go.Figure(data=[go.Pie(
    labels=age['나이'],
    values=age['비율'],
    hole=0.3,  # 구멍 크기 설정
    marker=dict(
        colors=px.colors.sequential.amp,  # 그래프 팔레트 설정
        line=dict(color='white', width=1.5)  # 윤곽선 색, 굵기 설정
    ),
    textfont=dict(size=13.5)  # 글차 크기 설정
)])

fig.update_layout(
    title={
        'text': '유기동물 나이별 비율',
        'y': 0.87,  # 제목의 y축 위치 (0.0 ~ 1.0)
        'x': 0.5,  # 제목의 x축 위치 (0.0 ~ 1.0),
        'font': dict(size=18, family='Arial', color='black'), # 제목 글자 크기 및 폰트, 색상 설정
        'xanchor': 'center',
        'yanchor': 'top'
    },
    paper_bgcolor='#EBE6E1',  # 외부 배경색 설정
    legend_title_text='나이'  # 범례 제목 설정
)

fig.show()
7. 히트맵
히트맵으로 상관계수 그래프를 그려보자.
데이터는 타이타닉 탑승자 데이터를 활용했다.
펭귄데이터와 마찬가지로 seaborn을 통해 바로 데이터를 가져올 수 있다.
import seaborn as sns

titanic = sns.load_dataset('titanic')
titanic = titanic[['survived','pclass','age','sibsp','fare']].corr()
기본 히트맵

fig = px.imshow(titanic, title = '타이타닉 생존자 상관계수 그래프', width=700, height=500)
fig.show()
히트맵- 스타일 커스터마이징
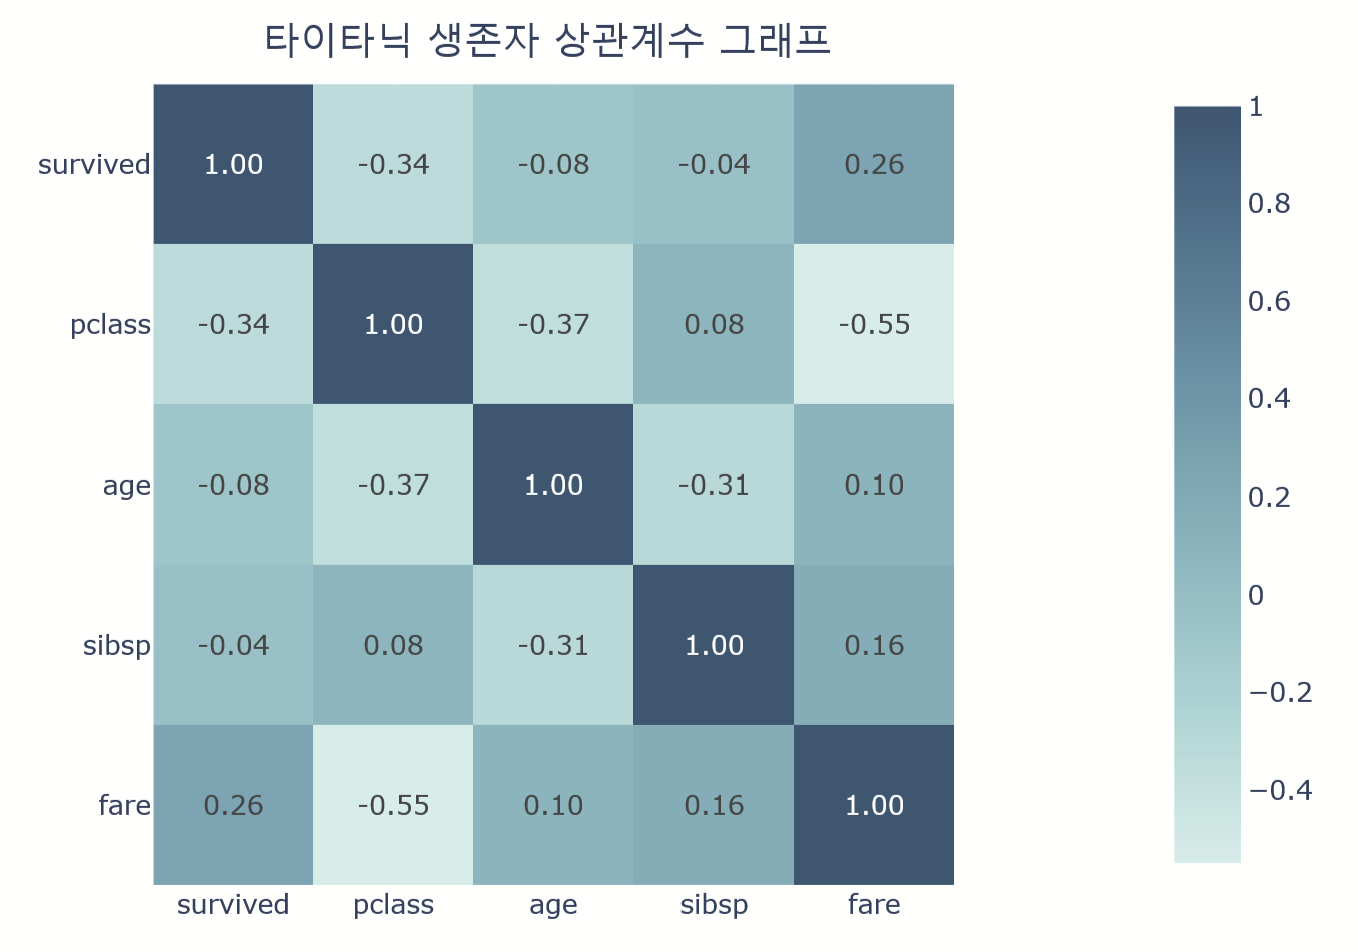
fig = px.imshow(titanic, text_auto='.2f', color_continuous_scale='Teal', width=700, height=500)

fig.update_layout(
    title={
        'text': '타이타닉 생존자 상관계수 그래프',
        'y': 0.93,
        'x': 0.48,
        'xanchor': 'center',
        'yanchor': 'top'
    }
)

fig.show()
'데이터 분석 > Python - 시각화' 카테고리의 다른 글
| [Python 시각화 라이브러리, Seaborn] seaborn 팔레트 종류 (0) | 2024.08.29 |
|---|---|
| [Python 시각화 라이브러리, seaborn] 그래프별 사용법 정리 (0) | 2024.08.28 |
| [Python 시각화 라이브러리, Plotly] plotly 컬러맵 종류 (1) | 2024.08.27 |


